Table of Contents
Devo 6

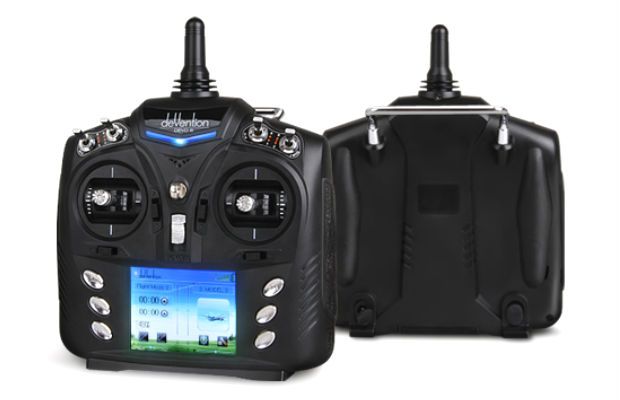
The Devo 6 shares the same smaller body as the Devo 7E but instead has a 320×240 pixel colour LCD touch screen similar to the Devo 8. In most ways the Devo 6 is actually a more compact version of the Devo 8.
| Features | |
|---|---|
| LCD | 320×240 18bit colour |
| Touch Screen | Yes |
| Gimbal Bearings | Yes |
| Switches | MIX (3-way) |
| GEAR (2-way) | |
| D/R (2-way) | |
| FMOD (3-way) | |
| Potentiometers | No |
| DSC (Trainer) Port | Yes |
| Charging Port | Yes (For NiMh only) |
| SD Card Slot | No |
| USB Upgradable | Yes |
| Power | 4 x AA |
Installing DeviationTx
Start by reading the Devo 6 manual.
Modifications
There are several documented modifications available for the Devo 6, including additional switches and trims which take it up to the same number of inputs as the Devo 8
Disassembly
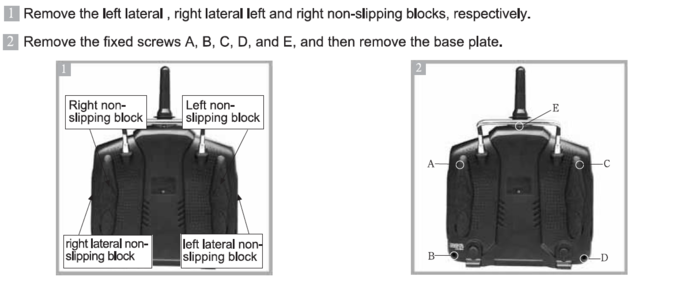
All modifications have to begin with disassembling the transmitter. Here's how to do it.

Note that the Devo 6 is held together with hex-head bolts rather than Phillips-head screws.
Extra RF Modules
You can install up to 3 extra RF modules in the Devo 6, for a total of 4 modules including the stock RF module. Two quite easily and the third via soldering directly to a processor pin.
Alternatively you can build the MultiModule instead. With the MultiModule, you will not need to solder to the processor pin and still use all 4 modules.
The process is very well documented in the wiki page “RF Module Installation”.
WK-DEVO-S-MOD RF Module
There are two versions of the Devo 6, the “6” and the “6S”; The latter uses the updated “S-MOD” telemetry module. Both the telemetry and non-telemetry modules are full-range plug-in modules common across the 6/8/10.
Add Two 2-way Switches or One 3-way Switch, plus Two pairs of trims
The Devo 6 was found to have unpopulated headers for several switches and trim pairs, which simply require soldering and the appropriate code to enable. This modification will add two 2-way switches labeled “SW A” and “SW B”, or one 3-way switch labeled “SW A”, plus two new pairs of trims.
- Adding switches to the Devo 6S by RoGuE_StreaK, Deal57, and mwm in our forum
Arduino to PPMin for Extra Inputs
The trainer port can be hijacked for an arduino to provide PPM signals from nearly any combination of switches and potentiometers. This modification effectively takes over the trainer port by mimicking a 2nd connected transmitter and injects PPM signal to the channels. Note that once you do this mod, you will not be able to connect another transmitter to the trainer port.
- Extra Potentiometer and Switch Inputs for Devo TX by JW57RC on rcgroups.com
- Extra inputs for Devo Tx's by mwm in our forum
Swivel Dipole Antenna Mod
The Devo 6 utilises a fixed monopole antenna, which provides a very compact antenna with diverse coverage, but reduced range compared to a dipole. Using a u.FL to SMA adapter, a 2 - 3dbi dipole antenna can be plugged directly into the transmitter module. Note that increased gains come at the expense of directionality; swivel and bend the replacement antenna to be as perpendicular as possible to your model when flying. It is recommended to stick to 2-3dbi, as higher gain antennas have an increasingly narrow transmission profile.
- Devo 7E Swivel Antenna Mod by hacksmods.com (same principle applies)
LiPo Battery Mod
Swap out to a higher capacity LiPo battery. Search around as there are now few manufacturers that make a LiPo specifically for the Devo 7E/6.
- Turnigy nano-tech in Devo 7E by Fyathyrio on rcgroups.com
- Battery Mod Devo 7E by Usjak in our forum
USB Charge Mod
Enable power in from the USB port.
- Devo 7e USB charge mod by KewlbasaDawg
3D Printable Parts
These are some parts that can be 3D printed to upgrade the Devo 7E/6.
- Devo 7E Main and Second Antenna Base by Sakunamary
- Devo 7E FPV Monitor/RX/Battery Mount by HLMAX
- Devo 7E Antenna Mount by HLMAX
- Devo 7E Antenna Mast by anansi22
Hardware Information
Note that the Devo 6 has been found to have essentially the same hardware and connections as the Devo 8. The trim matrix used is the same, although the Top Right and Top Left trim buttons are not installed. The switches use a different order of the same pins.