Table of Contents
Devo 7E

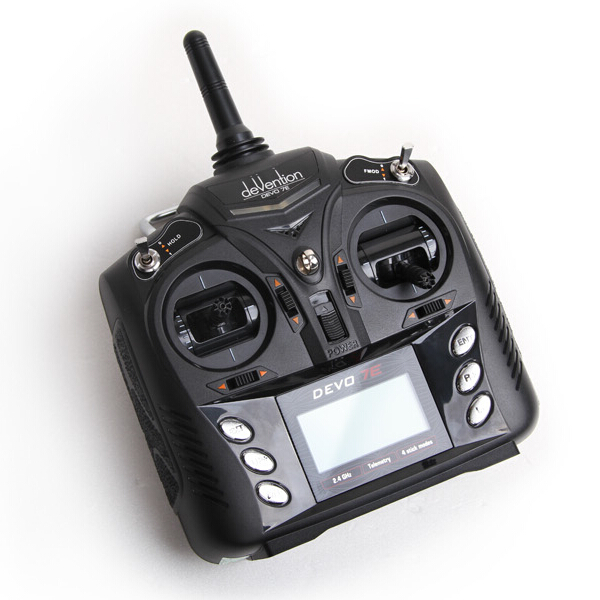
The Devo 7E is the best value for money transmitter that you can buy that DeviationTx supports. It shares the same smaller body as the Devo 6 but instead has a 128×64 pixel LCD screen similar to the Devo 10.
It however only has 128k of flash memory, which is barely sufficient for DeviationTx. It is equipped with only two 2-way switches and a range limited RF module. There are proven modification though to overcome these limitations.
- Introduction to the Devo 7E by SeBy DocKy
- Walkera Devo 7E transmitter with Deviation review by kenVersus
| Features | |
|---|---|
| LCD | 128×64 B/W with backlight |
| Touch Screen | No |
| Gimbal Bearings | Yes |
| Switches | HOLD (2-way) |
| FMOD (2-way) | |
| Potentiometers | No |
| DSC (Trainer) Port | Yes |
| Charging Port | Yes (For NiMh only) |
| SD Card Slot | No |
| USB Upgradable | Yes |
| Power | 4 x AA |
Installing DeviationTx
Start by reading the Devo 7E manual.
If that's not enough, the tutorials below should get you going.
- HowTo: Install DEVIATION on a Walkera Devo 7e by RCFanBlog
- DeviationTX Installation by SeBy DocKy
- Install Deviation Hack on DEVO Radio by benmlee.com
Modifications
Due to its' popularity and price, the Devo 7E probably has the most documented modifications available within the Walkera Devo line of transmitters. Here you'll find the tutorials and videos to get you started.
Disassembly
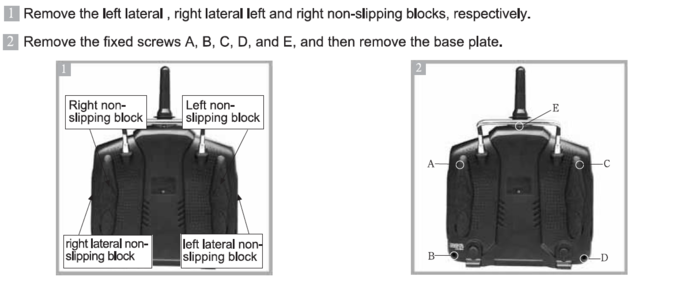
All modifications have to begin with disassembling the transmitter. Here's how to do it.

- Opening Devo 7E by jygravityRC
- Devo 7E Disassembling by SeBy DocKy
Extra RF Modules
You can install up to 3 extra RF modules in the Devo 7E, for a total of 4 modules including the stock RF module. Two quite easily and the third via soldering directly to a processor pin.
Alternatively you can build the MultiModule instead. With the MultiModule, you will not need to solder to the processor pin and still use all 4 modules.
The process is very well documented in the wiki page “RF Module Installation”.
Additional information can be found here:
- Devo 7E DeviationTx Flysky/Hubsan Mod by hacksmods.com
- Devo7E nRF24L01 mod by SeBy DocKy
- Devo7E CC2500 mod by SeBy DocKy
- 7e/Ultimate7e, adding the devo version 4in1 by HappyHarry in our forum
Full Range Mod
This will modify the stock RF module for full range. It requires removal of the shield and bypassing of a diode within module. Various methods for doing the bypass exists, so read through the tutorials and decide which you want to try.
- Walkera Devo 7e Transmitter Increase Range Mod by hacksmods.com
- Removing shield and diode 7E for better reach by Mullson in our forum
- Devo7E tutorials: part4 - CYRF6936 diode mod by SeBy DocKy
- Devo 7e range mod by jayodas
WK-DEVO-S-MOD RF Module
If you'd prefer not to fool around with soldering inside the stock RF module, or you damage the stock RF module, you can replace it with Walkera's full range module used in the Devo 6/8/10 transmitters. This requires removal of the stock RF module.
- WK-DEVO-S-MOD Module for Devo 7e by hacksmods.com
Add Two 2-way Switches
This modification will add two 2-way switches labeled “SW A” and “SW B”.
- Add Two switches to the Devo 7E by cmpang in our forum
Add One/Two 3-way Switches
This modification will add either one or two 2-way switches labeled “SW A” or “SW A” and “SW B” respectively.
- Adding Two 3-position Switches by straferr on rcgroups.com
- 3x2 Switches Mod by SeBy DocKy
Add Upto 4 3-way or 8 2-way (or any combination thereof) Switches
*3x4, 2x8 Switches by slipstream
Arduino to PPMin for Extra Inputs
The trainer port can be hijacked for an arduino to provide PPM signals from nearly any combination of switches and potentiometers. This modification effectively takes over the trainer port by mimicking a 2nd connected transmitter and injects PPM signal to the channels. Note that once you do this mod, you will not be able to connect another transmitter to the trainer port.
- Extra Potentiometer and Switch Inputs for Devo TX by JW57RC on rcgroups.com
- Extra inputs for Devo Tx's by mwm in our forum
Swivel Antenna Mod
Install an external swappable swivel antenna to improve reception and reliability.
- Devo 7E Antenna Mod by Iurii Merdok
- CYRF6936 Antenna Mod by SeBy DocKy
- Devo 7E Swivel Antenna Mod by hacksmods.com
LiPo Battery Mod
Swap out to a higher capacity LiPo battery. Search around as there are now few manufacturers that make a LiPo specifically for the Devo 7E.
- Turnigy nano-tech in Devo 7E by Fyathyrio on rcgroups.com
- Battery Mod Devo 7E by Usjak in our forum
Power Regulator Upgrade
Adding higher power handling regulators for the extra load due to the RF module upgrades.
- AMS1117 Replacement Regulator by Fernandez in our forum
- Pololu 3.3V Step-Up/Step-Down Voltage Regulator by Fernandez in our forum
Add Power-on LEDs
Have an LED light up when the power is turned on.
- Not really any tutorials, but lots of hints on rcgroups.com
USB Charge Mod
Enable power in from the USB port.
- Devo 7e USB charge mod by KewlbasaDawg
3D Printable Parts
These are some parts that can be 3D printed to upgrade the Devo 7E.
- Devo 7E Main and Second Antenna Base by Sakunamary
- Devo 7E FPV Monitor/RX/Battery Mount by HLMAX
- Devo 7E Antenna Mount by HLMAX
- Devo 7E Antenna Mast by anansi22
Other Devo 7E Resources
- New Devo 7E Radio from Walkera on rcgroups.com