- Posts: 55
Jumper T8SG Tx 2 switches mod
- Hr
-
Topic Author
- Offline
Less
More
19 Dec 2017 19:56 - 19 Dec 2017 20:32 #66536
by Hr
Jumper T8SG Tx 2 switches mod was created by Hr
First you have to buy 2 SPDT switches, you can find it at
m.banggood.com/RC-Transmitter-Switch-For...32.html?rmmds=search
Switches installation:
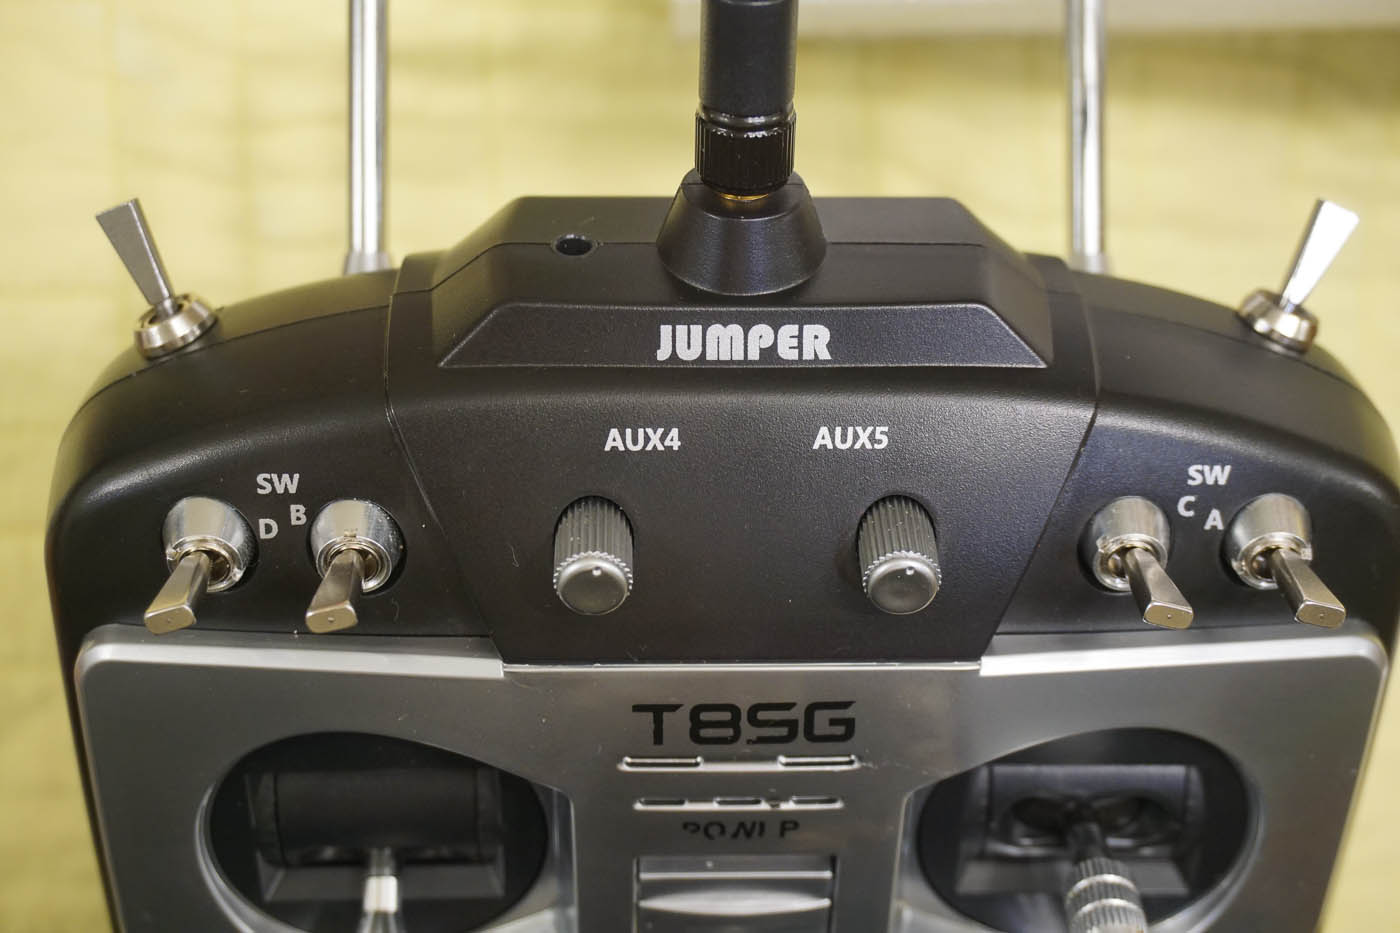
ramunas wrote: The goal is to keep the shoulder switches close to the rear corners. The pictures show where I chose to put the switches in the case top. Use the rear-most two switch contacts to maintain the normal 0-1 switch convention. Heat shrink over the unused pin. I chose to run the 2 wires from each switch down the rear case section and back up the front case section to the connection points documented by Vlad. This allows the case to be opened as a clamshell as in the pictures. Removing the trainer jack wiring plug from the main board, allows the front and rear case section to open all the way flat like a book so you can work on it. The depth of the rear case section could accommodate the normal mini switch without any projection into the front of the case if you can mount the switch vertically. But the top of the case has a slope, that tilts the shoulder switches about 15 degrees and results in some contact with SWA and SWD. Jumper coui9ld solve that by molding in flat vertical attachment points in the rear portion of the case. But in my case, I saw the switch solder tabs on SWA and SWD are longer than they need to be. So I just snipped off the ends of the solder tabs until the case closed properly. You can see that in the pictures. So as you mount the shoulder switches, keep them as far to the rear of the case as you reasonably can.
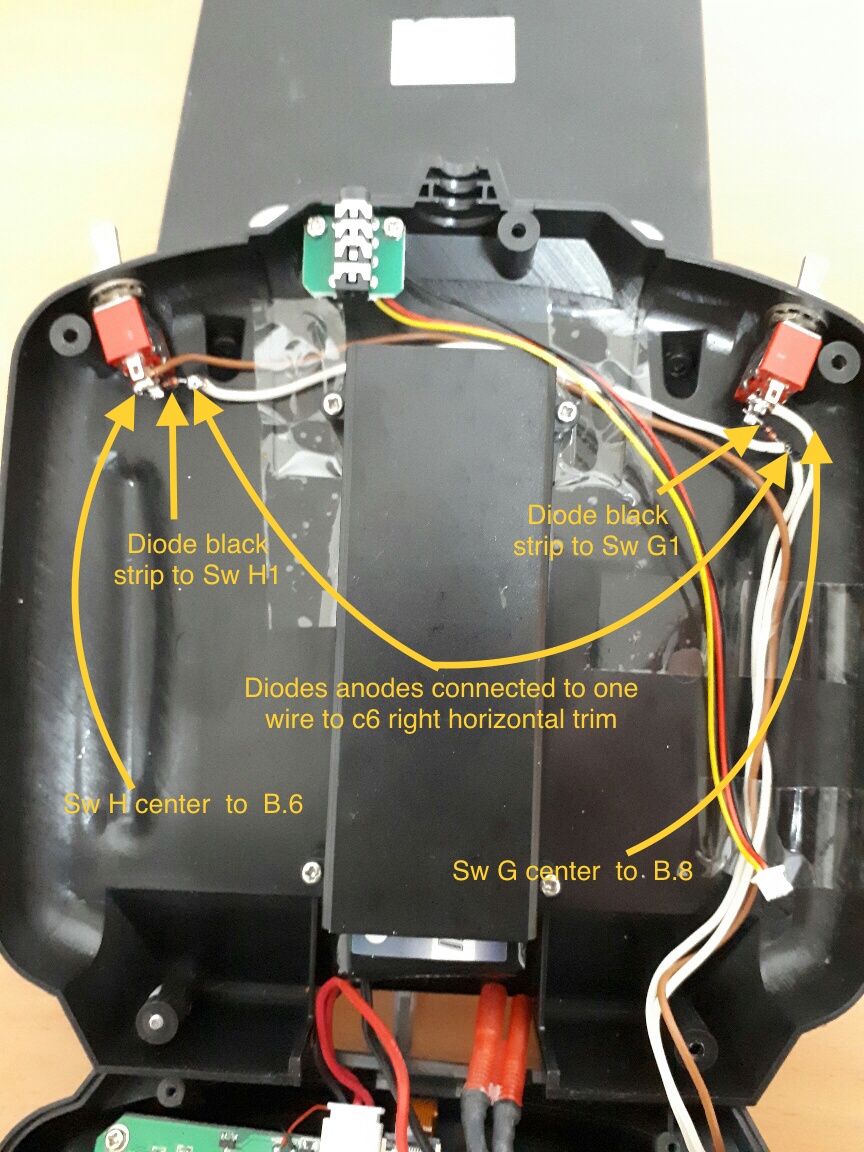
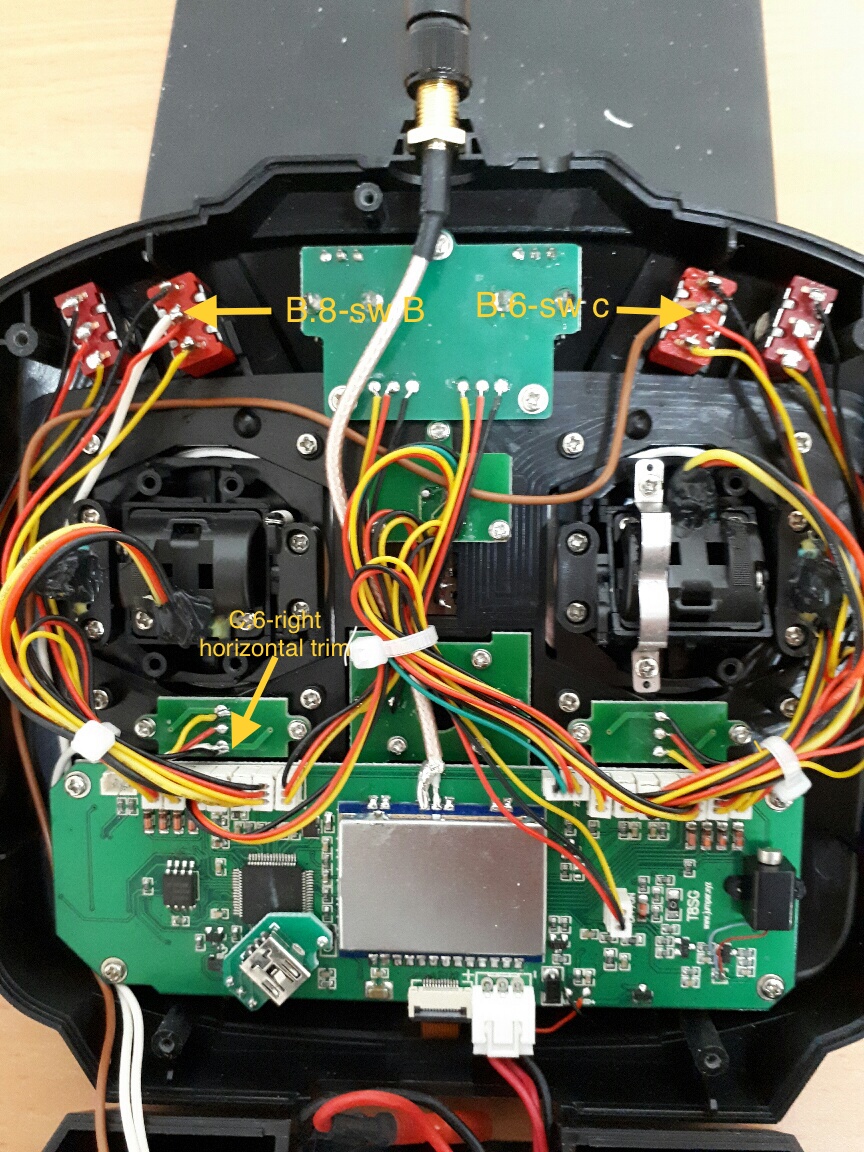
Switches wirinig : (attached photos)
Following Vlad's posting
2x1 (SWH1) and 2x2 options (SWG1).
need two 1N4001 diodes connected: anodes to C.6 and catodes (black or white strip) to SWH1 and SWG1. And switch center pin SWH connected to B.6 and SWG connected to B.8.
SWH = C.6 ●--►|--●--○ \--● B.6
SWG = C.6 ●--►|--●--○ \--● B.8
Soldering points:
C.6 -> throttle trim yellow wire soldering pad (or right horizontal trim black wire soldering pad)
B.6 -> SWC switch center pin (SWC1, red wire)
B.8 -> SWB switch center pin (SWB1, red wire)
hardware.ini change:
;switch_types: 3x4, 3x3, 3x2, 3x1, 2x8, 2x7, 2x6, 2x5, 2x4, 2x3, 2x2, 2x1, potx2, potx1
;May occur more than once if necessary.
;Add nostock if stock FMOD and HOLD switches have been removed.
extra-switches = nostock
extra-switches = 3x4
extra-switches = 2x2
extra-switches = potx2
Thanks to Vlad and ramunas
Last edit: 19 Dec 2017 20:32 by Hr. Reason: Change photo
Please Log in or Create an account to join the conversation.
- joohaky
-
- Offline
Less
More
- Posts: 5
28 Dec 2017 13:32 #66629
by joohaky
Replied by joohaky on topic Jumper T8SG Tx 2 switches mod
Is it possible to add 3 position switches instead of 2 position switches?
I only have two 3 position switches with me.
I only have two 3 position switches with me.
Please Log in or Create an account to join the conversation.
- vlad_vy
-
- Offline
Less
More
- Posts: 3333
28 Dec 2017 13:40 #66630
by vlad_vy
Replied by vlad_vy on topic Jumper T8SG Tx 2 switches mod
No, maximum four 3-pos switches + two 2-pos switches.
Please Log in or Create an account to join the conversation.
- joohaky
-
- Offline
Less
More
- Posts: 5
29 Dec 2017 07:55 - 29 Dec 2017 07:56 #66636
by joohaky
Replied by joohaky on topic Jumper T8SG Tx 2 switches mod
What if I install 3 pos switches instead of 2 pos switches? Are these 3 pos switches working as 2 pos switches? or they don't work at all?
If they still works as 2 pos switches, I can use two of 3 pos switches I have now.
If they still works as 2 pos switches, I can use two of 3 pos switches I have now.
Last edit: 29 Dec 2017 07:56 by joohaky.
Please Log in or Create an account to join the conversation.
- vlad_vy
-
- Offline
Less
More
- Posts: 3333
29 Dec 2017 08:56 #66637
by vlad_vy
Replied by vlad_vy on topic Jumper T8SG Tx 2 switches mod
You can use 3-pos switches as 2-pos without problems.
Please Log in or Create an account to join the conversation.
- horrigan
-
- Offline
Less
More
- Posts: 13
29 Dec 2017 10:42 #66638
by horrigan
Replied by horrigan on topic Jumper T8SG Tx 2 switches mod
I'm a bit lost as to what you are trying to achieve , there are four 3 position switches on the T8SG, And they are all set up as two position switches. So what's the problem? i had to set up a three position switch for the three flight mods, and that leaves three two position switches
Please Log in or Create an account to join the conversation.
- Tonyai
-
- Offline
Less
More
- Posts: 1
15 Feb 2018 02:40 #67516
by Tonyai
Replied by Tonyai on topic Jumper T8SG Tx 2 switches mod
Thanks for the information, I am new for the deviation system,by the way where I can get the information for defined each switch function.
Please Log in or Create an account to join the conversation.
- marcnh33
-
- Offline
Less
More
- Posts: 1
19 Jun 2018 14:56 #69677
by marcnh33
Replied by marcnh33 on topic Jumper T8SG Tx 2 switches mod
i do not understand what is happening.... i have wired everything up as on the pictures but now when i push switch 1 it works as a enter button! and switch 2, when i switch that one on i get telemetry on my screen!!..... do i miss something??? i have checked the ini file and it shows the same as what you say..... what to do? because i really need that 2 extra switches!! please help TNX
Please Log in or Create an account to join the conversation.
- vlad_vy
-
- Offline
Less
More
- Posts: 3333
20 Jun 2018 04:51 #69678
by vlad_vy
Replied by vlad_vy on topic Jumper T8SG Tx 2 switches mod
Check diodes direction.
Please Log in or Create an account to join the conversation.
- Brett_N
-
- Offline
Less
More
- Posts: 53
07 Sep 2018 15:28 - 07 Sep 2018 15:29 #70725
by Brett_N
Replied by Brett_N on topic Jumper T8SG Tx 2 switches mod
Here's my take on the additional switch mod. I wanted push buttons instead of toggles for things like arming, bombs, etc. Wiring is EXACTLY the same as with toggles (sorry, no pics)
https://photos.app.goo.gl/KkPY8wyoDGJXUJh18
https://photos.app.goo.gl/JpvczsaN6ZmfKZ5i8
Although I love Banggood, shipping takes forever. Have no fear, there's always Digikey! costs a buck or 2 more, but shows up next day. The push buttons I used are MSPS103C0 but don't seem to be available anymore, but, ANY SPST OFF-MOM switch will work. Here's a link to 168,000 different ones
https://www.digikey.com/products/en/switches/pushbutton-switches/199/page/1Digikey SPST Off-MOM Switches
Last edit: 07 Sep 2018 15:29 by Brett_N.
Please Log in or Create an account to join the conversation.
Time to create page: 0.118 seconds


