
Table of Contents
Adding voice support
The unmodified Devo transceivers only support sound output using the internal buzzer. By adding a cheap voice module and a speaker, you can enable deviation to play custom mp3 files on switch action, telemetry alarm and many other things. The MP3 files used are located on a MicroSD card in an additional hardware module, the Devo transmitter needs a voice.ini within the media folder which contains information about the files available on the MicroSD card and each files duration. For details concerning usage, please refer to the manual.
Voice alerts are available by installing the appropriate hardware and the latest nightly Deviationtx.com Downloads for your TX. The voice feature runs on all Deviation platforms except for Devo7e due to memory limitations.
There are custom builds available for Devo 7e users with standard GUI disabled but voice enabled. This build can play the voice alerts, but the voice configuration editor menu is not available due to RAM space limitations. The 7e Emulator available together with the custom 7e build has these features so that voice configurations and models can be edited. Models can also be edited manually on a PC.
Audio players supported
Currently the following MP3 modules are supported:
Most experience by users has been with DFPlayer Mini, so it is the recommended module.
In addition to the player module, the voice alerts system needs a speaker and power. In an internal installation, the addition of a USB port simplifies changes and updates.
Speakers tested:
Knowles 2403-260-00001, 15mm x11mm micro 8 Ohm speaker
Radio Shack 273-092 29mm round micro 8 Ohm speaker
Most speakers perform better with the addition of a sound box
Optional Items:
Pololu Step Up/Step Down voltage regulator, Pololu part S7V8A, set to 4.2v
Micro USB female jack wired to the USB TX/RX of the player to access voice files
Mono headphone jack for headphones
Indicator LED - wired to the Busy port it will blink when the voice is playing
Plenty of 30 gauge wire and/or Micro JST 2.0 PH 2-Pin Connector, M/F pairs
Wiring diagram
Communication between the MP3 module and Deviation is handled by a 9k6 serial signal which is by default sent to the trainer jack of your deviation transmitter. This means, that voice will not be available when using the trainer port for PPM in- or output.
User Deal57 created the following schematic for wiring a DFplayer to the trainer port:
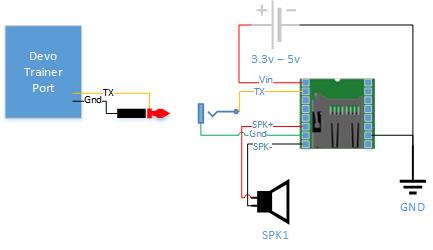
This is an example of an external voice box. Use a 1/8“ (3.5mm) mono cable to connect from the Devo trainer port (labeled DSC) to the voice box. In this case the box includes volume buttons and has cutouts to allow access to the USB port and MicroSD card of the DFPlayer.

These are the parts used for an internal voice module for the Devo 12e.


For internal connections, the trainer port connector offers solder points so you can tap directly into the PPM TX line from the processor. For the Devo 7e, 6s, 8s, and 10 (possible others?), use these solder points for the PPM TX and ground lines.

For the Devo 12e, the trainer port connector has these solder points:

There are two Devo transmitter configurations that have exceptions to these connections:
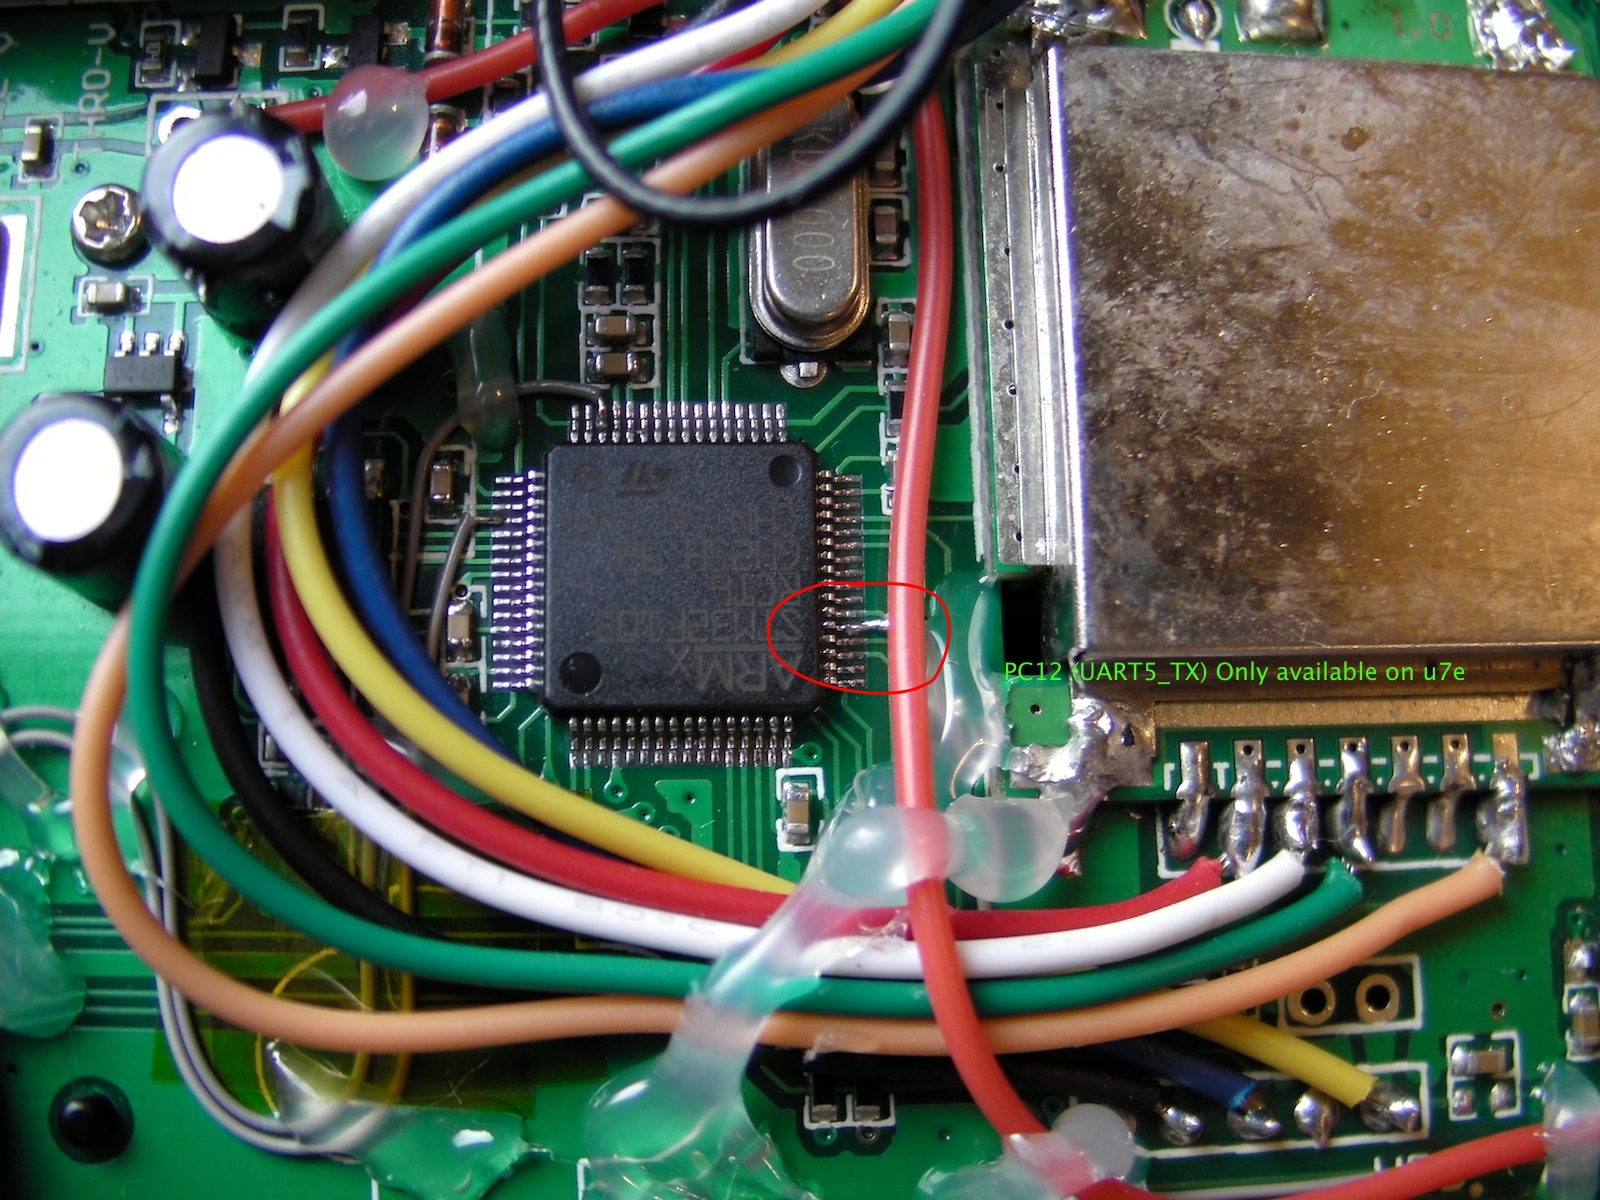
Devo7e-256 (a.k.a. Ultimate7E)
Besides using the trainer port, you can solder directly to a free MCU pin for UART5. In hardware.ini you have to enable the corresponding line to use UART5. Phantom8 provided the following picture:
Devo12/S
The serial signal is not available at the trainer port, but rather on a neat pin header labeled “TX/RX” on the Main board - perfect for internal installation of a DFPlayer module.
Powering the Voice Alert Module
The DFPlayer module can be powered by 3.3v to 5v, with 4.2v recommended. A fully charged 1S, 3.6v lipo provides adequate voltage. At full volume the board may use 70ma+ momentarily, and in standby it is rated at 20ma. In testing, a 200mah 3.6 lipo lasted over two weeks of regular use (15-20 min/day).
Although not required, the Pololu S7V8A adjustable stepup/stepdown regulator can ensure that the voltage is consistent and stable. It can be wired to a 3.3 or 5v switched source near the power circuits (the location of which will vary by TX) to avoid affecting other electrical needs of the transmitter. The S7V8A can also be wired directly to the battery-in port, provided that the -SHUTDOWN is connected (varies by TX).
Here are some example power locations for transmitters. The forums may provide additional information as more pilots adopt the voice alerts feature.
- In the Devo 12e, connect to the Vdd and ground on the Debug port. This may be a good power source for the Devo 10 as well.
- In the Devo 6s, the Vdd and ground on the Debug port are convenient, and can be used if there are not other add-ons in use (such as the Multiprotocol board or other transmitter modules).
- In the Devo 7e power is a challenge: search the forum for more details. This excellent post is a good place to start.
Jumper T8SG V2
The Jumper T8SG V2 and T8SG V2 plus are already prepared for installation of a DFplayer module.
The picture shows the necessary parts to get started. Basically any speaker with 22 mm diameter works fine.
 First, you need to remove 2 pins on the left and 6 pins on the right side of the DFplayer module as depicted below.
 Now you can solder module to the T8SG V2 PCB. You will have to unmount the main PCB to solder the pins on the bottom side.
 The speaker can be mounted beneath the RF module at the top of the case and wired to the adjacent free header with a PH1.25 mm connector or directly wired to pins on the DFplayer module.
 To fit the battery compartment, you will have to cut along the prepared lines with a sharp knife or a small saw to make room for the DFplayer before reassembling the transmitter.
 Follow the software instructions below and setup hardware.ini for DFplayer and UART5 usage:
voice=dfplayer
voice-uart5=1
Software Configuration
Install and Configure the voice alert sound files
Using the DFPlayer MicroSD card
The DFPlayer uses a small MicroSD card with the standard USB Storage Device file system. Use a MicroSD card with a capacity of at least 64MB – yes, that's MEGABYTE, not GIGABYTE, so pretty much any old MicroSD card will be sufficient. The MicroSD card can be formatted and accessed from a PC or Mac. Prior to using in the Voice Alerts system, the MicroSD card must be formatted and loaded with the correct voice alert files.
USB Format and Access:
The DFPlayer MicroSD card can be formatted on your PC or MAC, after which files can be dragged-n-dropped as needed. If the card is formatted and inserted into the DFPlayer, the card is also accessible from your PC or Mac by connecting to the DFPlayer USB port. Either way, the card appears as a USB storage device on your PC or Mac.

Voice Files:
Deviation software nightly builds do include the voice features since April 2017, but the user must also download a set of voice alerts. The files are currently available in the Deviationtx.com Downloads folder under Test Builds/[Moeder]voice_packs and are available in English, French and German. Each zip file includes the required MP3 Folder and a voice.ini file catalog.
You can also use the Deviation Voicepacker service to create your own custom voice sets. This service will continue to evolve.
The files for the DFPlayer are saved using MP3 format and are contained in the \MP3 folder on the MicroSD card. The MicroSD must be set up with the \MP3 folder and all the voice alert files must be in that folder. No other files or folders need to be on the card, so the card can be a small as 64MB (the actual disk storage for the largest file set is under 2MB).
Each file is named to correspond to DFPlayer MP3 file name convention, which requires a 4-digit number as the first four characters of the filename, and a filetype of MP3 (ex: 0000.MP3 or 0000Welcometodeviation.MP3). MAC users should be aware of special file handling requirements as detailed on the DFRobot page.

Deviation transmitter software changes
Once the voice alerts hardware is available and files are on the player, there are three changes required to the transmitter software.
Update hardware.ini file
The first change is to update the hardware.ini file to include a line(s) defining the voice player hardware. For the DFPlayer, use “voice=dfplayer” and remove the semicolon from the first character of the line. Use “voice=audiofx” for the AudioFX players. If your audio device is wired to the UART5 port (only available on the Devo7e-256), you must also add “voice-uart 5=1” and remove the semicolon.
The used audio player (and possibly the special wiring for Devo7e-256) has to be enabled in hardware.ini located in the root directory of your transmitter:
;Audio player connected to UART (Devo12/S internally, others via trainer port): audiofx, dfplayer
;voice=
voice=dfplayer
;
;Enable if audio device is wired to uart5 instead of ppm on devo7e-256
;voice-uart5=1
;
Deviation Voice Media catalog file voice.ini
The voice alert files are cataloged in a file called voice.ini that must be copied to the deviation \media (\mymedia on Devo12(S)) folder on the transmitter. The voice.ini file contains lines that correspond to each voice alert file (ex: “0=Welcome to deviation,1617”) that map the MP3 file name and duration for Deviation. Each set of deviation voice alert files must have a voice.ini file to match.

Update Model.ini files
The third change to the deviation transmitter is to configure the sounds in each model by using the voice config menu of each model (except for devo7e) or by directly editing the model.ini.
Adjust transmitter volume
The output volume of the transmitter can be adjusted using the Transmitter Menu, Transmitter Config, Audio volume.
Setting up the emulator for voice alerts
Download and unzip the emulator package for your transmitter.
- Download the \mp3 folder and files and place the \mp3 folder in the same folder with the exe. The \mp3 folder is included in the voice alerts zip file from Test Builds/[Moeder]voice_packs or in the voice packs created by Deviation Voicepacker.
- Update the file system as you would update the TX file system:
- Make appropriate changes to the hardware.ini
- Copy the voice.ini to the \media folder
- Edit each model.ini to enable sounds or use the voice configuration menu (except devo7e, see above).
