Advanced Search

Search Results (Searched for: )

  • Himalindas
  • Himalindas's Avatar
Yesterday 06:57
Replied by Himalindas on topic Ultimate7ELRS

Ultimate7ELRS

Category: Development

将文件 Ultimate7ELRS_2024-06-25.zip 重命名为 Ultimate7ELRS.zip , 去掉 .z01 至 .z18 文件后面的 .zip 后缀才能解压整个压缩包。

Rename file Ultimate7ELRS_2024-06-25.zip to Ultimate7ELRS.zip , delete .z01 to .z18 file's .zip tail to unpack the whole pack.
  • Himalindas
  • Himalindas's Avatar
Yesterday 10:42 - Yesterday 06:26
Replied by Himalindas on topic Ultimate7ELRS

Ultimate7ELRS

Category: Development

Remember to delete 01-18 files' .ZIP tail.

File Attachment:

File Name: Ultimate7ELRS.z10.zip
File Size:2,048 KB

File Attachment:

File Name: Ultimate7ELRS.z11.zip
File Size:2,048 KB

File Attachment:

File Name: Ultimate7ELRS.z12.zip
File Size:2,048 KB

File Attachment:

File Name: Ultimate7ELRS.z13.zip
File Size:2,048 KB

File Attachment:

File Name: Ultimate7ELRS.z14.zip
File Size:2,048 KB

File Attachment:

File Name: Ultimate7ELRS.z15.zip
File Size:2,048 KB

File Attachment:

File Name: Ultimate7ELRS.z16.zip
File Size:2,048 KB

File Attachment:

File Name: Ultimate7ELRS.z17.zip
File Size:2,048 KB

File Attachment:

File Name: Ultimate7ELRS.z18.zip
File Size:2,048 KB
  • Himalindas
  • Himalindas's Avatar
Yesterday 10:40 - Yesterday 06:21
Replied by Himalindas on topic Ultimate7ELRS

Ultimate7ELRS

Category: Development

I pack the whole related file in this one pack:

File Attachment:

File Name: Ultimate7E...6-25.zip
File Size:428 KB

File Attachment:

File Name: Ultimate7ELRS.z01.zip
File Size:2,048 KB

File Attachment:

File Name: Ultimate7ELRS.z02.zip
File Size:2,048 KB

File Attachment:

File Name: Ultimate7ELRS.z03.zip
File Size:2,048 KB

File Attachment:

File Name: Ultimate7ELRS.z04.zip
File Size:2,048 KB

File Attachment:

File Name: Ultimate7ELRS.z05.zip
File Size:2,048 KB

File Attachment:

File Name: Ultimate7ELRS.z06.zip
File Size:2,048 KB

File Attachment:

File Name: Ultimate7ELRS.z07.zip
File Size:2,048 KB

File Attachment:

File Name: Ultimate7ELRS.z08.zip
File Size:2,048 KB

File Attachment:

File Name: Ultimate7ELRS.z09.zip
File Size:2,048 KB
  • Himalindas
  • Himalindas's Avatar
Yesterday 10:26 - Yesterday 06:30
Replied by Himalindas on topic Ultimate7ELRS

Ultimate7ELRS

Category: Development

Here is the KICAD project file.

File Attachment:

File Name: Ultimate7E...0.00.zip
File Size:623 KB

File Attachment:

File Name: Ultimate7E...anel.zip
File Size:5 KB

File Attachment:

File Name: GERBERUlti...ICAD.zip
File Size:431 KB

File Attachment:

File Name: GERBERUlti...OTEL.zip
File Size:430 KB
  • Himalindas
  • Himalindas's Avatar
Yesterday 10:12 - Yesterday 06:40
Ultimate7ELRS was created by Himalindas

Ultimate7ELRS

Category: Development

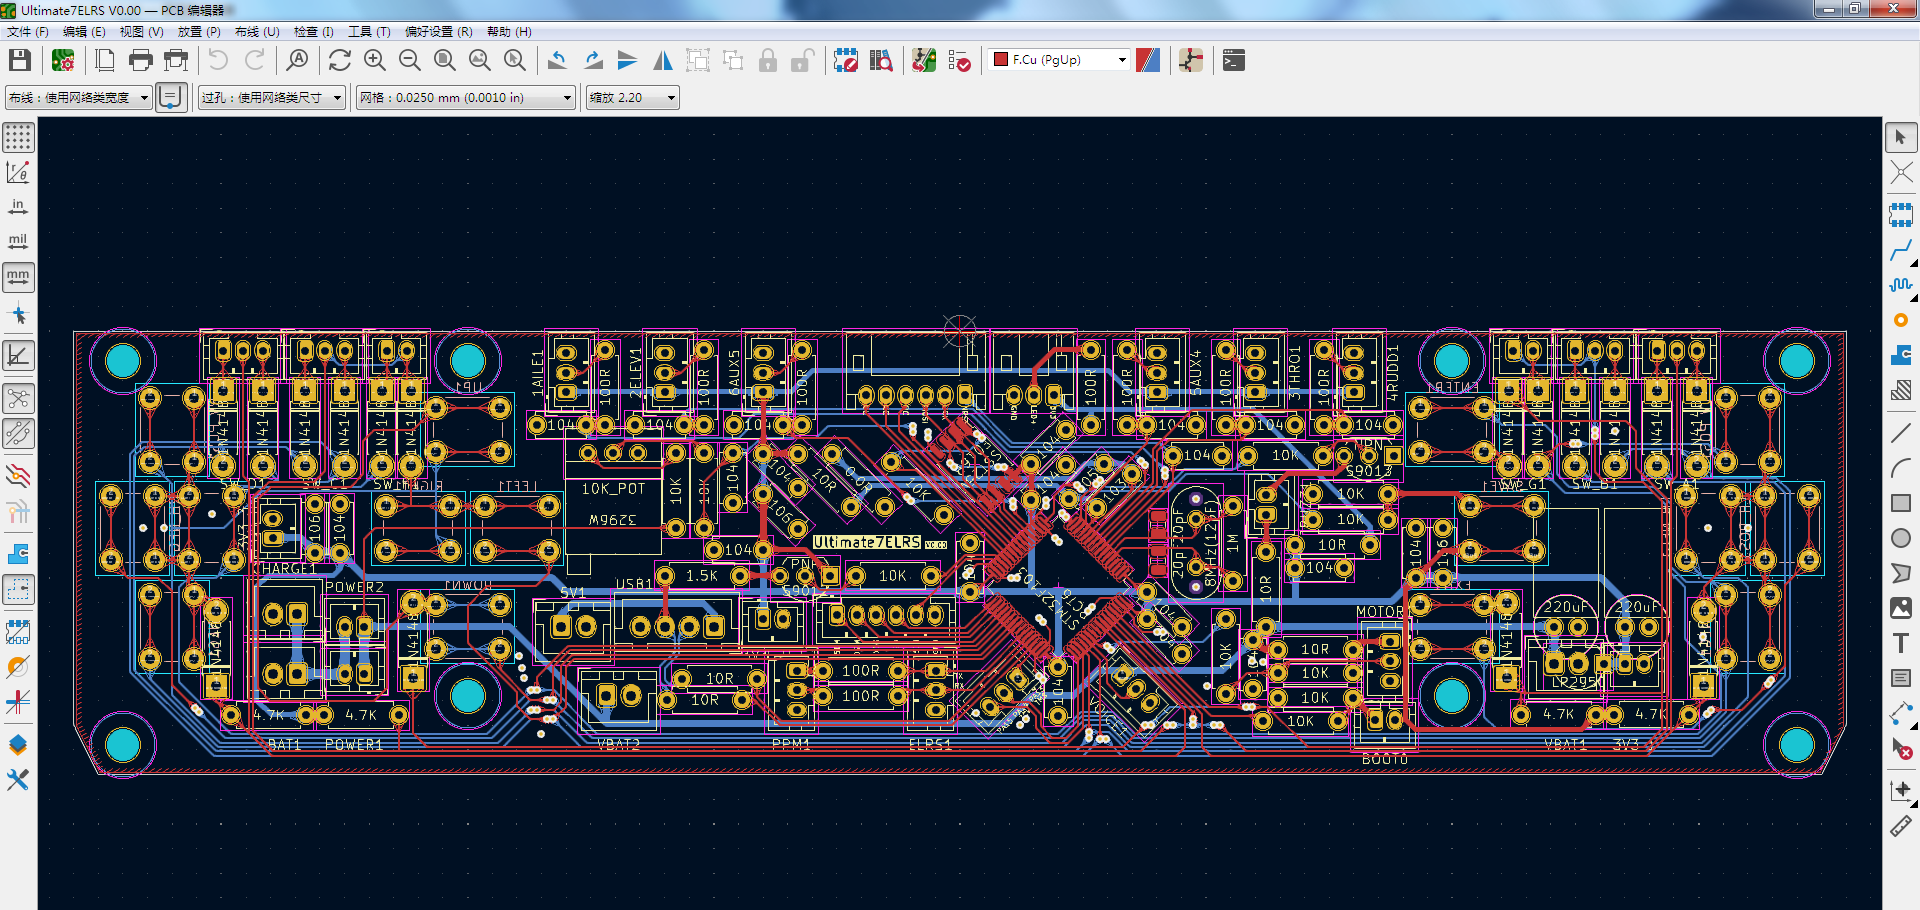
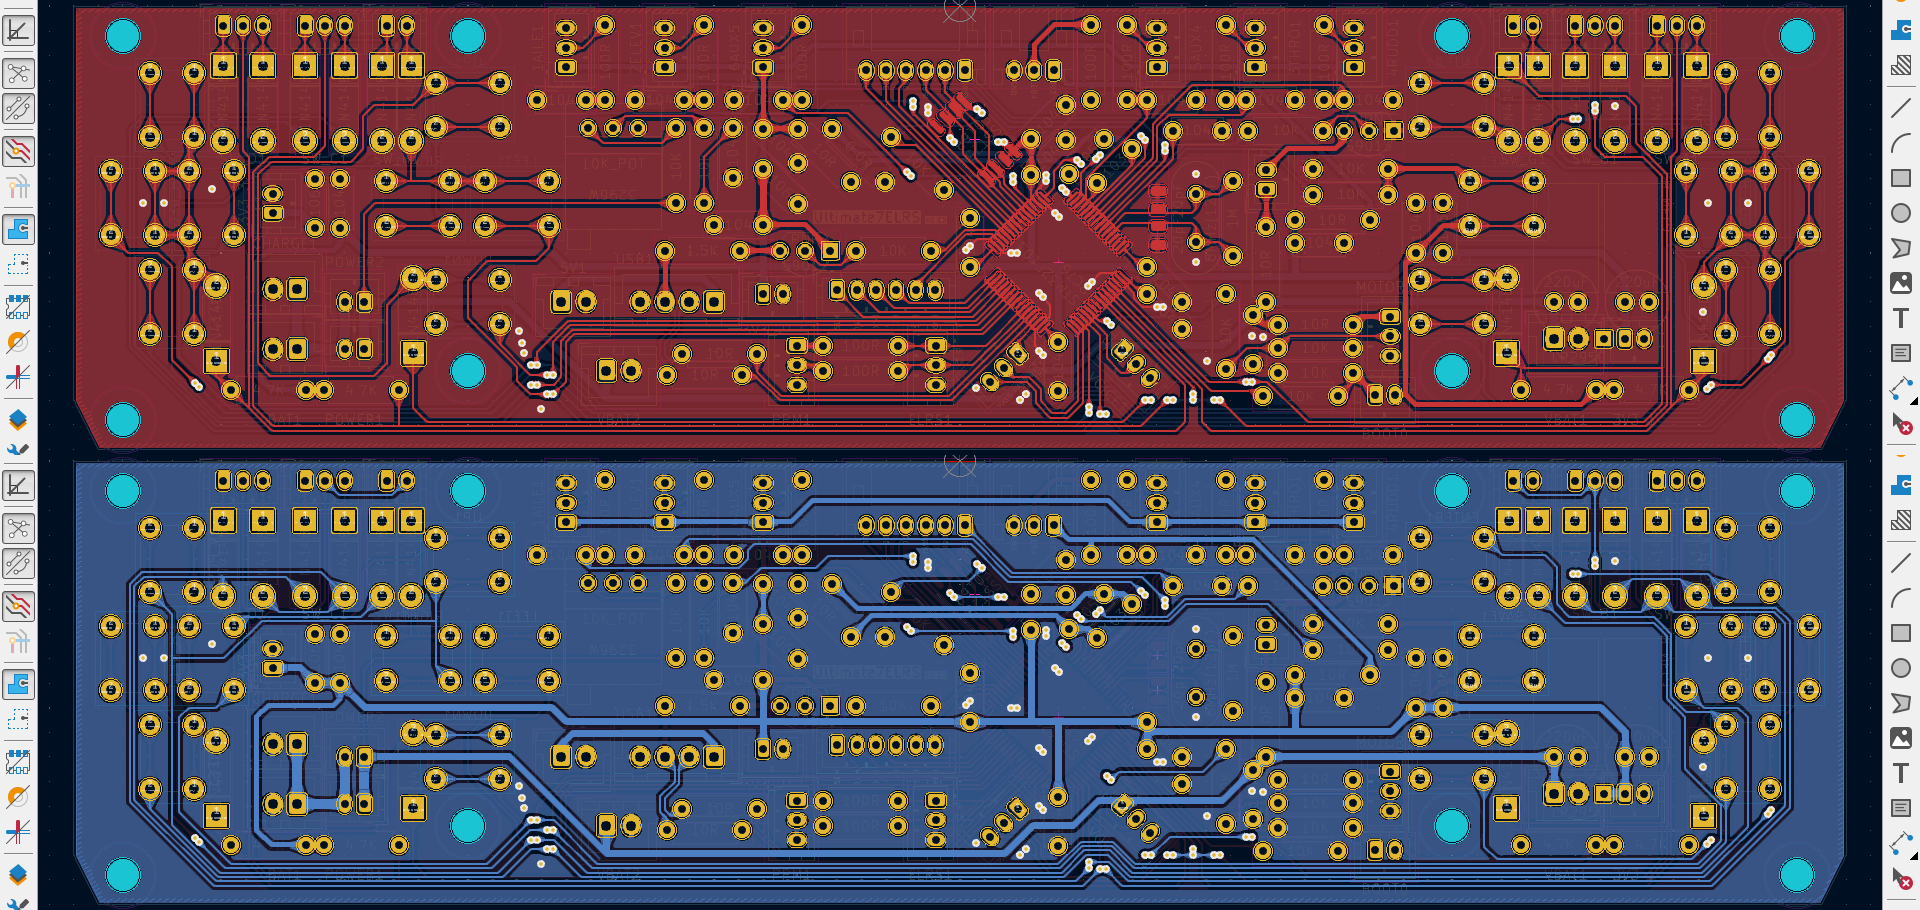
Hellow ! My english is not good. I am trying to build Ultimate7E from ZERO.
So far I only finished the PCB desine with KICAD. I will publish the whole project here. I am also come here to get some support help and check.


可使用的屏幕有很多选择。原装屏幕:NT7538。兼容屏幕:ST7565、SSD1306、SSD1309。

使用ST7565屏幕时会出现画面左右相反的镜像问题。有3种方法解决这个问题:

1.刷 T8SG 或 T8SG V2 的固件。

2.修改 LCD.C 初始化条目其中一条的参数 A0 为 A1 。

3.将液晶屏幕的电路基板和背光板翻转到玻璃面板的另一面。

使用SSD1306、SSD1309屏幕则只能刷 T8SG V2+ 的固件。

如果对固件进行调整,有可能支持 320 X 240 的高分辨率屏幕。

There are many options for the screens you can use. Original screen: NT7538. Compatible screens: ST7565, SSD1306, SSD1309.

When using the ST7565 screen, there is a mirror problem where the picture is opposite to the left and right. There are 3 ways to solve this problem:

1. Flash the firmware of T8SG or T8SG V2.

2. Change parameter A0 of one of the LCD.C initialization entries to A1.

3. Flip the circuit plate and backlight plate of the LCD screen to the other side of the glass panel.

When using SSD1306 and SSD1309 screens, you can only flash T8SG V2+ firmware.

If the firmware is adjusted, it is possible to support high resolution screens of 320 X 240.


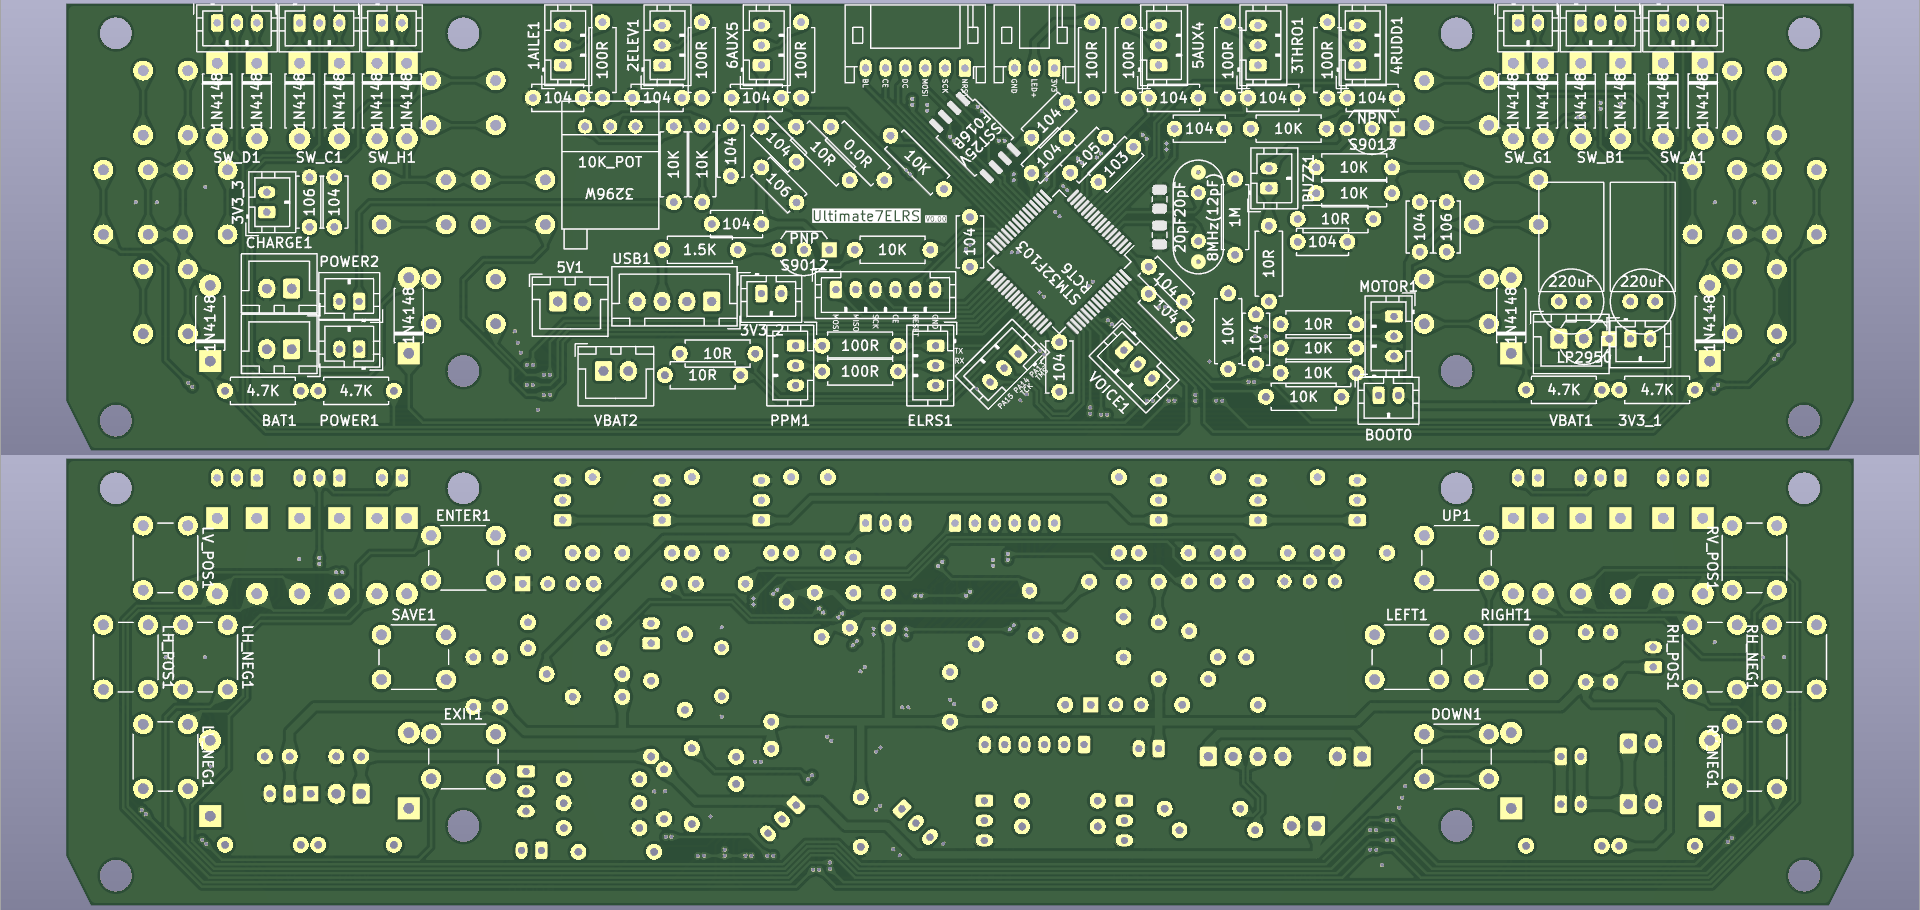
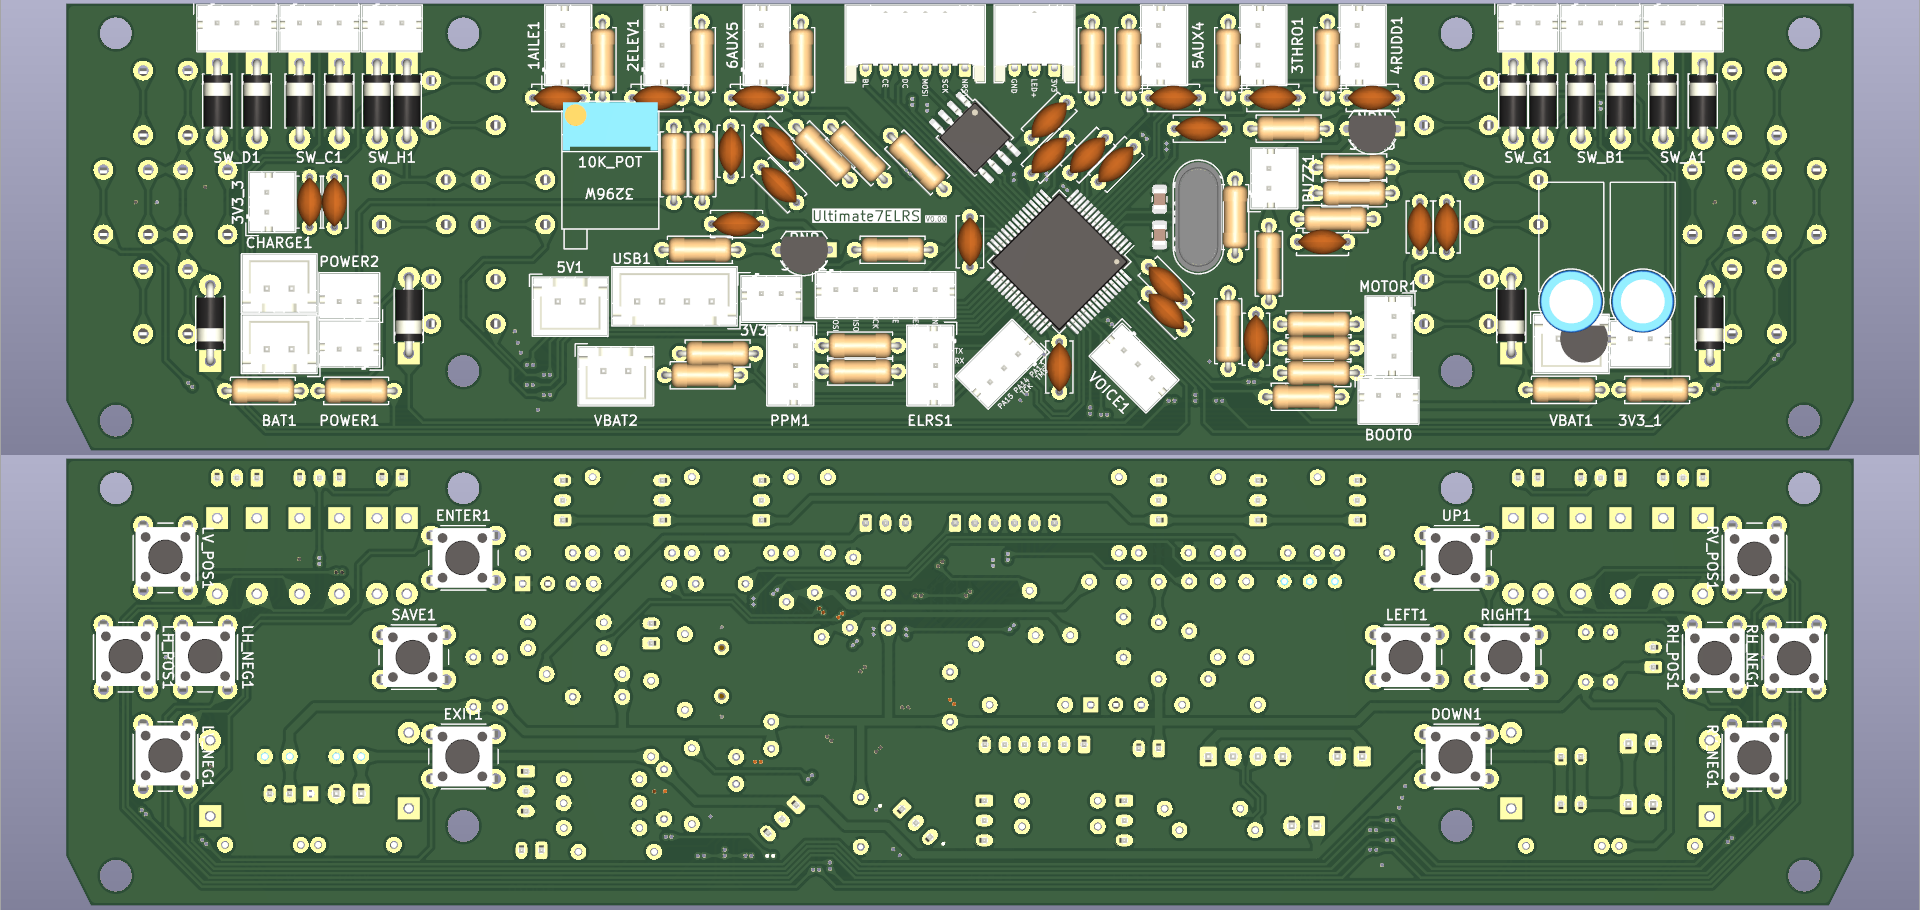
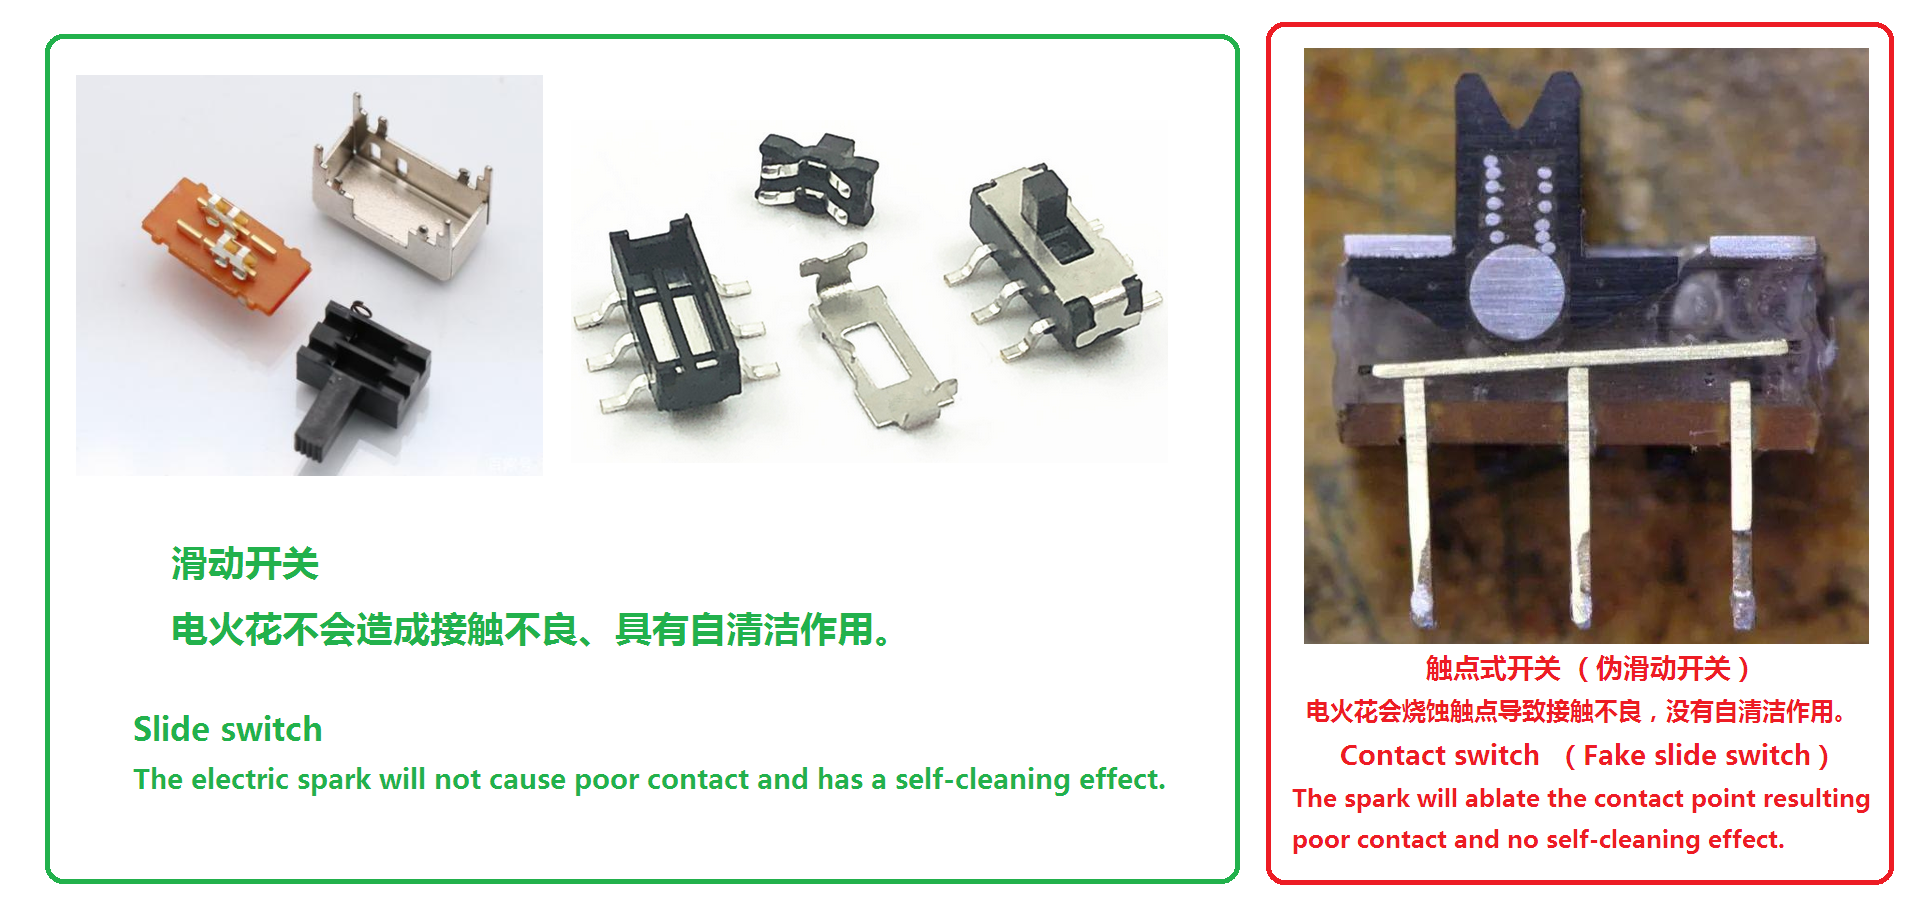
电源开关设计为两个或四个滑动开关并联。原装的电源软开关电路已经被去掉。电源按钮只支持滑动开关的硬开关。注意不要使用圆形的触点式自锁按钮。

硬开关每次接通或断开时内部都会产生微小的电火花,电火花会烧蚀触点导致接触不良。滑动开关被烧蚀的位置和电流流通触点的位置间隔了一点距离所以不会接触不良,而且每次滑动的动作都会起到清洁一次触点的作用。

由于软开关电路被去掉所以多出了一个 SAVE 保存按钮。只有在这个按钮被按下时才会保存设置。并且当这个按钮被按下时背光会关闭。虽然没有经过测试有可能蜂鸣器、喇叭、电机、高频头都会被关闭。有3种方法解决这个问题:

1.给 SAVE 按钮进行特殊保护防误触。

2.用两个外接按钮串联,只有同时按下时才会保存。

3.修改固件去除关闭任何功能、新增 [设置以保存] 提示。


Power switches are designed with two or four sliding switches in parallel. The original power softswitch circuit has been removed. The power button supports only the hard switch of the sliding switch. Be careful not to use the round contact type self-locking button.

Each time a hard switch is turned on or off, a small electrical spark will be generated inside the switch, which will ablate the contact point and cause poor contact. The position of the sliding switch is ablated and the position of the current flow contact point is a little distance away, so there is no bad contact, and each sliding action will play a role in cleaning the contact point.

Since the softswitch circuit is removed, a SAVE button is added. The Settings are saved only when this button is pressed. And the backlight turns off when this button is pressed. Although not tested it is possible that the buzzer, voice, motor, TX module will be turned off at the same time. There are 3 ways to solve this problem:

1. Apply special protection to the SAVE button to prevent accidental touch.

2. Use two external buttons in series, which will be saved only when pressed at the same time.

3. Modify the firmware to prevent disable any function and add the "Settings being saved" prompt.


电池设计为 1S 4.2V 单节锂电池。3.3V 电源既可以使用 LDO 也可以使用外置 自动升降压模块 。

原装电源电路里的一个二极管被去掉,导致电压测量线性问题,电源电压显示不正确。如果在满电时调整 3296W精密多圈电位器 校准电压后,亏电时电压会显示不正确。亏电时校准电压后满电时会显示不正确。只有修改固件能解决这个问题。

注意要编辑 TX.INI 中一个条目 batt_critical=3300 。否则会产生低电压无法保存的问题。3300的意思是3.3V。 如果使用 自动升降压模块 则可以改为 batt_critical=3000 。

3.3V 电源如果使用 LDO 方案可使用 LP2950 或 LP2950-N 。使用这两者的时候要注意 C-out 电容的 ESR 不能太低,不能使用 104、106 等陶瓷电容。同时目前并不清楚电路下游的大量陶瓷电容会不会对 LDO 产生影响。

LDO 方案不可以使用 HT7333 系列。该系列有电压过冲缺陷,会烧毁主控。

如果使用 2S 8.4V 两节锂电池需要做很多调整:

1.先将 3296W 调到中间再通电,防止烧主控管脚。

2.蜂鸣器、喇叭、电机、高频头等模块都是直接接到电池的,需要调整相应电阻。如果模块不支持高压则不能使用。


Battery design is 1S 4.2V single lithium battery. The 3.3V power supply can use either an LDO or an external BUCK-BOOST module.

One diode in the original power supply circuit was removed, resulting in voltage linear measurement problems and incorrect supply voltage display. If the 3296W precision multi-turn potentiometer is calibrated at full power, the voltage will be displayed incorrectly at low power. When calibrated at low power, the voltage will display incorrectly when it is fully charged. Only modify the firmware can solve this problem.

Note that to edit an entry batt_critical=3300 in TX.INI. Otherwise, the settings cannot be saved at low battery voltage. 3300 means 3.3V. If you are using an BUCK-BOOST module, you can change to batt_critical=3000.

3.3V power supply If the LDO solution is used, LP2950 or LP2950-N can be used. When using these two, it should be noted that the ESR of the C-out capacitor cannot be too low, and ceramic capacitors such as 104 and 106 cannot be used. At the same time, it is not clear whether the large number of ceramic capacitors downstream of the circuit will affect how to the LDO.

The HT7333 series cannot be used in LDO solutions. This series has a voltage overshoot defect, which will burn the MCU.

If you use 2S 8.4V two lithium batteries, you need to make many adjustments:

1. First adjust the 3296W to the middle and then power on to prevent burning the main control pin.

2. Buzzer, voice, motor, TX module are directly connected to the battery, need to adjust the corresponding resistance. If the module does not support high voltage, it cannot be used.


所有的二极管都是按键矩阵使用的起 防按键冲突 作用。理论上只有给每个按键加一个二极管才能全键无冲,实际上很多按键并不会同时被按下所以可以共用一个二极管:

左边四个微调按键共用一个二极管。右边四个微调按键共用一个二极管。上下键共用一个。左右键共用一个。

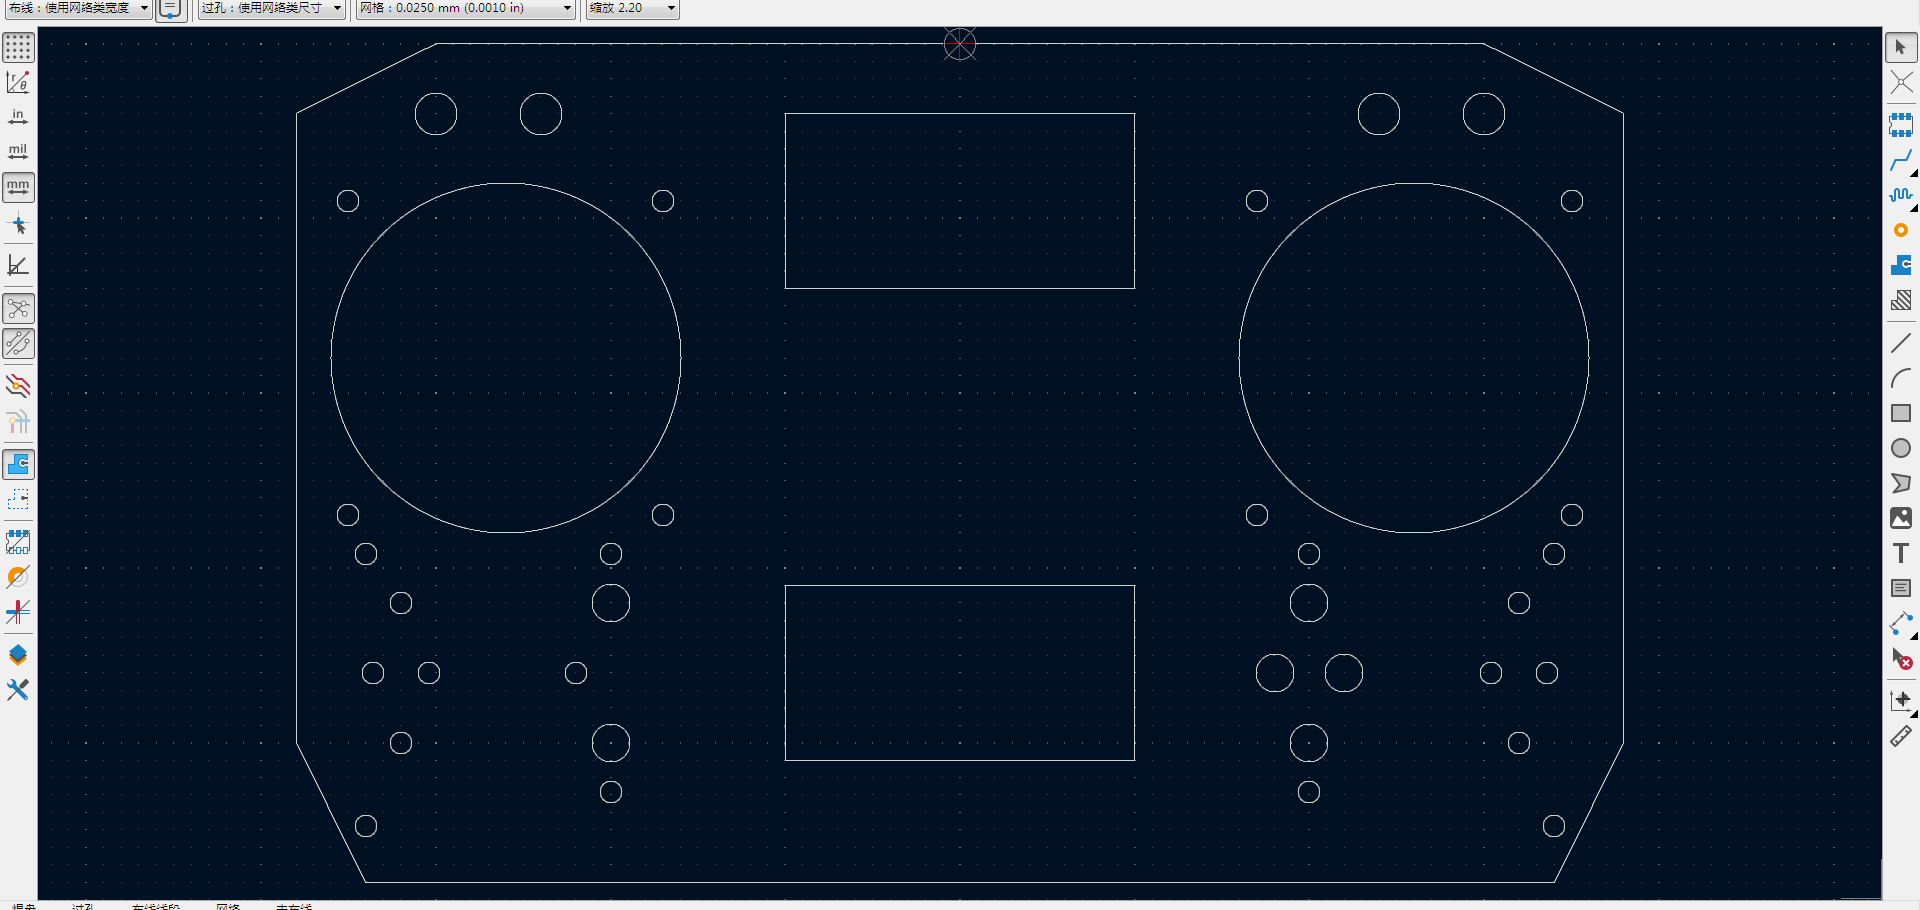
设计为 4个三档开关 和 2个两档开关 和 2个旋钮。 HARDWARE.INI 要做如下修改,去除下面四行前面的 [ ;] 号 :

extra-switches = nostock
extra-switches = 3x4
extra-switches = 2x2
extra-switches = potx2

所有 4个三档开关 都没有共用一个二极管而是每边都接了一个二极管,所以任何一个三档开关都可以拆分为 2个两档开关 ,当然 HARDWARE.INI 要做相应设置 。

二极管可以使用 1N400x 系列, 1N4148 更好,肖特基二极管最好。目前并不清楚为什么许多人说不能使用肖特基二极管。也并不清楚 1N400x 系列是不是仅仅只比按键扫描速度快一点点,是否存在不稳定性的问题。


All diodes are button matrix used to prevent key conflict. In theory, only by adding one diode to each button can be all key no conflict, in fact, many keys will not be pressed at the same time, so many can sharing one diode:

The four trim buttons on the left share one diode. The four trim buttons on the right share one diode. The up and down buttons share one diode. The left and right buttons share one.

Designed with four 3.POS switches and two 2.POS switches and two knobs. HARDWARE.INI needed to make the following modification, remove the [;] before the following four lines:

extra-switches = nostock
extra-switches = 3x4
extra-switches = 2x2
extra-switches = potx2

All four 3.POS switches do not share one diode but are connected to one diode on each side, so any 3.POS switch can be separate into two 2.POS switches, of course, the HARDWARE.INI needed to make the corresponding Settings.

Diodes can use 1N400x series, 1N4148 is better, schottky diode is the best. It is not clear why many people say schottky diodes cannot be used. It's also not clear whether the 1N400x series is just a little faster than the button matrix scanning speed lead to any instability issues.


外置高频头模块如果没有接会出现 MISSING MODULE CYRF6936 警告。最新固件按确认按钮可以跳过。所有固件都可以编辑 HARDWARE.INI 去除警告:

enable-cyrf6936 = 0
has_pa-cyrf6936 = 0

If the external TX MODULE is not connected, a MISSING MODULE CYRF6936 warning will be displayed. Latest firmware Press the Enter button to skip. All firmware can edit HARDWARE.INI to remove warning:

enable-cyrf6936 = 0
has_pa-cyrf6936 = 0


主控不但可以使用256K闪存的 STM32F103RCT6 ,应该也可以使用512K闪存的 STM32F103VCT6 。

The MCU can use not only the STM32F103RCT6 with 256K flash memory, but also the STM32F103VCT6 with 512K flash memory.
  • Krit
  • Krit's Avatar
21 Jun 2024 00:12
Optimal Сasual Dating - Living Women was created by Krit

Optimal Сasual Dating - Living Women

Category: General Discussions

Connect casually with like-minded individuals on the ultimate dating platform.
Verified Damsels
Top-notch casual Dating
  • -=Hubi-Dirk=-
  • -=Hubi-Dirk=-'s Avatar
09 Jun 2024 16:34
Replied by -=Hubi-Dirk=- on topic FrSky RX to DSM2 RX - channels changed

FrSky RX to DSM2 RX - channels changed

Category: General Discussions

I hope that a good compromise can be found for the required values for the servo travels.

I have seen that I have photographed an incorrect setting in the second picture on page 2 (Ail-Mix). Mux = add must be set here.

But in the ini file you are using it is programmed correctly, I have just checked it.
  • Donthemon
  • Donthemon's Avatar
09 Jun 2024 10:10
Replied by Donthemon on topic FrSky RX to DSM2 RX - channels changed

FrSky RX to DSM2 RX - channels changed

Category: General Discussions

Hi - thanks for the latest model.ini. I now understand how to add the switch controlled flight mode! I also understand that a lot of my confusion has been with the deviationtx gui as implemented on the Devo 7E transmitter. The transmitter is small, very light and ideal for DLG, slope and the other disciplines I fly, but the gui is truly AWFUL!

I am still struggling with the very small amount of aileron movement offered by this mix. I have tried changing all of the curves for each of the channel mixes, both one at a time and in combination, but nothing seems to work. Today I'm starting with a fresh copy of your mix and will go through all of the settings yet again. I mean, it's cold outside and probably going to be raining all day, so what else is there to do!:P

Many thanks for all of your help with this.

Don
  • -=Hubi-Dirk=-
  • -=Hubi-Dirk=-'s Avatar
04 Jun 2024 12:27
Replied by -=Hubi-Dirk=- on topic FrSky RX to DSM2 RX - channels changed

FrSky RX to DSM2 RX - channels changed

Category: General Discussions

Here the ini-File.

File Attachment:

File Name: model40_20...6-04.ini
File Size:8 KB
  • -=Hubi-Dirk=-
  • -=Hubi-Dirk=-'s Avatar
04 Jun 2024 12:23 - 04 Jun 2024 12:36
Replied by -=Hubi-Dirk=- on topic FrSky RX to DSM2 RX - channels changed

FrSky RX to DSM2 RX - channels changed

Category: General Discussions

Here is an overview of the CH3 mixer with all three pages. CH2 has exactly the same structure.


  • -=Hubi-Dirk=-
  • -=Hubi-Dirk=-'s Avatar
04 Jun 2024 12:20 - 04 Jun 2024 12:36
Replied by -=Hubi-Dirk=- on topic FrSky RX to DSM2 RX - channels changed

FrSky RX to DSM2 RX - channels changed

Category: General Discussions

Donthemon wrote: I can adjust the amount of Elevator movement quite easily using the 'Subtrim' and 'Scale' adjustments in the simple and complex parts of the mix, but this also affects the amount of Aileron movement.The Aileron control surface movement is far too small and I cannot increase the amount of movement to what I need using any of the adjustments in either of the two channels, without making the elevator movement far too large.

Okay, I understand that. Here it is necessary to limit the deflection of Ele so that you still have the necessary reserve on the servo travel for Ail. This can be achieved, for example, with a curve that consists of 7 points in the simplest case (optimal for visualization). The Devo can have 13 points, so you can adjust the curve more optimally than in this example.

  • -=Hubi-Dirk=-
  • -=Hubi-Dirk=-'s Avatar
04 Jun 2024 11:54
Replied by -=Hubi-Dirk=- on topic FrSky RX to DSM2 RX - channels changed

FrSky RX to DSM2 RX - channels changed

Category: General Discussions

Here ist the ini-File with the Flight Mod function. Try it out :)
  • Donthemon
  • Donthemon's Avatar
04 Jun 2024 09:45
Replied by Donthemon on topic FrSky RX to DSM2 RX - channels changed

FrSky RX to DSM2 RX - channels changed

Category: General Discussions

Hi - I made a mistake when I said that I had fully resolved the control movement problem. I have been playing about with so many different models to try and get this to work that I was looking at a different model.ini (which I broke and had to restore back...sighI)

So, I DO have the elevon control surfaces moving in the correct way (I use a mode 2 setup):

- Aileron stick moved right, the right hand elevon surface (that is, looking from behind, with the model pointing away from me) goes up and the left hand elevon surface goes down,
- Aileron stick moved left, the right hand elevon surface goes down and the left hand elevon surface goes up
- Elevator stick pushed forward (down elevator), both elevon surfaces go down
- Elevator stick pulled back (up elevator), both elevon surfaces go up

I have attached a picture so you can see the control surface layout

I can adjust the amount of Elevator movement quite easily using the 'Subtrim' and 'Scale' adjustments in the simple and complex parts of the mix, but this also affects the amount of Aileron movement.
The Aileron control surface movement is far too small and I cannot increase the amount of movement to what I need using any of the adjustments in either of the two channels, without making the elevator movement far too large.

So, while I still need a switch to drop both elevons a couple of mm, I still can't adjust the control surface movements in the way I need them.

Very confusing.
  • -=Hubi-Dirk=-
  • -=Hubi-Dirk=-'s Avatar
03 Jun 2024 15:56
Replied by -=Hubi-Dirk=- on topic FrSky RX to DSM2 RX - channels changed

FrSky RX to DSM2 RX - channels changed

Category: General Discussions

That's good that everything is now working as it should.

For fight mode, you need to add another page to the two complex mixers for CH 2 and Ch3, in which you use the “Add” command to add the desired value via the desired switch.

You are welcome to give me your current ini and I will program it for you. Then you can take a look at it and learn just like that ;)
  • Donthemon
  • Donthemon's Avatar
03 Jun 2024 14:21
Replied by Donthemon on topic Detailed documentation?

Detailed documentation?

Category: General Discussions

Hi - thanks for your Kunai model.ini, but I am obviously still missing something (or a lot of things).

However much I look at this, I just can't see how you would create this model.ini. With previous Graupner or JR transmitters, I would, for example, use menus to first select a flight mode, then select a channel to be changed, then make the change(s) I wanted and that would be it. Devo is obviously doing this in a very different way, and I just can't see how.

I think I understand, at least conceptually, how deviation works, with channel assignments, mixes to/from each channel, a flow of input channel -> mix(s) -> output channel. The trouble is that the Devo 7E gui is so awful to use (I tried loading the emulator, but couldn't get it to work properly), that I cannot see how to add a switch that will change the subtrim of a channel, without affecting the rest of the mix or doing nothing at all.

I can't be the only inexperienced deviation user with these problems, but I cannot find anything that explains how to do things like a setting above on a Devo 7E.

Any help, would be gratefully received.
  • Donthemon
  • Donthemon's Avatar
03 Jun 2024 13:45
Replied by Donthemon on topic FrSky RX to DSM2 RX - channels changed

FrSky RX to DSM2 RX - channels changed

Category: General Discussions

Hi - sorry for not getting back to you, but I have hacked around with the model.ini and now seem to have all of the settings I need for channel and mixer scale and subtrim. So, many thanks for your help, really useful.

Do you know if there is anything anywhere that will show me how to use the Fmode switch as a flight mode switch? All of the posts I could find just say that it's really easy, but don't give any instructions. I just need to drop each elevon a couple of mm using a two position switch, then flick back to normal mode, but can't see how to do it.

Thanks
  • -=Hubi-Dirk=-
  • -=Hubi-Dirk=-'s Avatar
28 May 2024 17:17 - 28 May 2024 17:28
Replied by -=Hubi-Dirk=- on topic FrSky RX to DSM2 RX - channels changed

FrSky RX to DSM2 RX - channels changed

Category: General Discussions

You have made a lot of effort!!!

Unfortunately, it only helps me to a limited extent with the implementation, because it is still not clear to me from the description and the very good graphics how, for example, the mechanical control of the servos on the elevons takes place, is the linkage at the top or bottom of the elevon...

Let's perhaps try it with the direction of the stick in conjunction with the channel monitor. Please complete the following example according to the required reaction. It would be sufficient if you want to assign the terms positive and negative accordingly:

Ele stick up = CH2 positive value
Ele stick up = CH3 positive value

Ele stick down = CH2 negative value
Ele stick down = CH3 negative value

Ail stick left = CH2 positive value
Ail stick left = CH3 negative value

Ail stick right = CH2 negative value
Ail stick right = CH3 positive value
  • Donthemon
  • Donthemon's Avatar
28 May 2024 14:55
Replied by Donthemon on topic FrSky RX to DSM2 RX - channels changed

FrSky RX to DSM2 RX - channels changed

Category: General Discussions

Hi - see attached. I use mode 2 on the transmitter, so Aileron is the right hand transmitter stick moved side to side, Elevator is the right hand transmitter stick moved forward and backward.

So, with the model facing forward:
Aileron control moves right:
- right hand elevon goes up,
- left hand elevon goes down.
Aileron control moves left:
- right hand elevon goes down
- left hand elevon goes up.
Elevator control pulled back:
- both elevons move up
Elevator control pushed forward:
- both elevons move down

Basically, to make the newest model39.ini work, I made the following changes to the actual Alula model plane and the latest model39.ini :

- With the model facing forward, the left hand elevon servo is now connected to channel 3 on the receiver (Elevator)
- With the model facing forward, the right hand elevon servo is now connected to channel 2 on the receiver (Aileron)
- The Devo 7E gui AIL channel is reversed
- The Devo 7E gui ELE is reversed

Hope this makes sense.
  • -=Hubi-Dirk=-
  • -=Hubi-Dirk=-'s Avatar
28 May 2024 13:37
Replied by -=Hubi-Dirk=- on topic FrSky RX to DSM2 RX - channels changed

FrSky RX to DSM2 RX - channels changed

Category: General Discussions

Very pleased that it worked. Deviation is powerful there are many ways to achieve the goal.

(ii) swap the right hand wing servo plug from the Ele channel to the Ail channel on the receiver and the left hand wing servo plug from the Ail channel to the Ele channel on the receiver,

This would not be a problem to adapt in programming. Since I do not know how the servos are installed and which flaps is controlled with them. If you would like to create a small drawing showing the relationship between stick/direction and servo/direction, then I can adapt it.
  • Donthemon
  • Donthemon's Avatar
28 May 2024 13:10
Replied by Donthemon on topic FrSky RX to DSM2 RX - channels changed

FrSky RX to DSM2 RX - channels changed

Category: General Discussions

Hi - you are a genius: it works!

I did have to:
(i) reverse both the Ail and Ele channels,
(ii) swap the right hand wing servo plug from the Ele channel to the Ail channel on the receiver and the left hand wing servo plug from the Ail channel to the Ele channel on the receiver,
(iii) change all of the scale and offset values in the complex mixes (no surprises there),
...but it works, so who cares?

You have succeeded in creating a simple elevon mixer where I and several other far more experienced deviation specialists have previously failed. I can stop using those virtual mixes! :)

Many thanks!
Displaying 1 - 20 out of 76173 results.
Time to create page: 0.245 seconds
Powered by Kunena Forum