
- Posts: 43
7e/Ultimate7e, adding the devo version 4in1
- ClittleJ
-
- Offline
Less
More
09 Mar 2017 12:17 - 09 Mar 2017 12:29 #60031
by ClittleJ
Replied by ClittleJ on topic 7e/Ultimate7e, adding the devo version 4in1
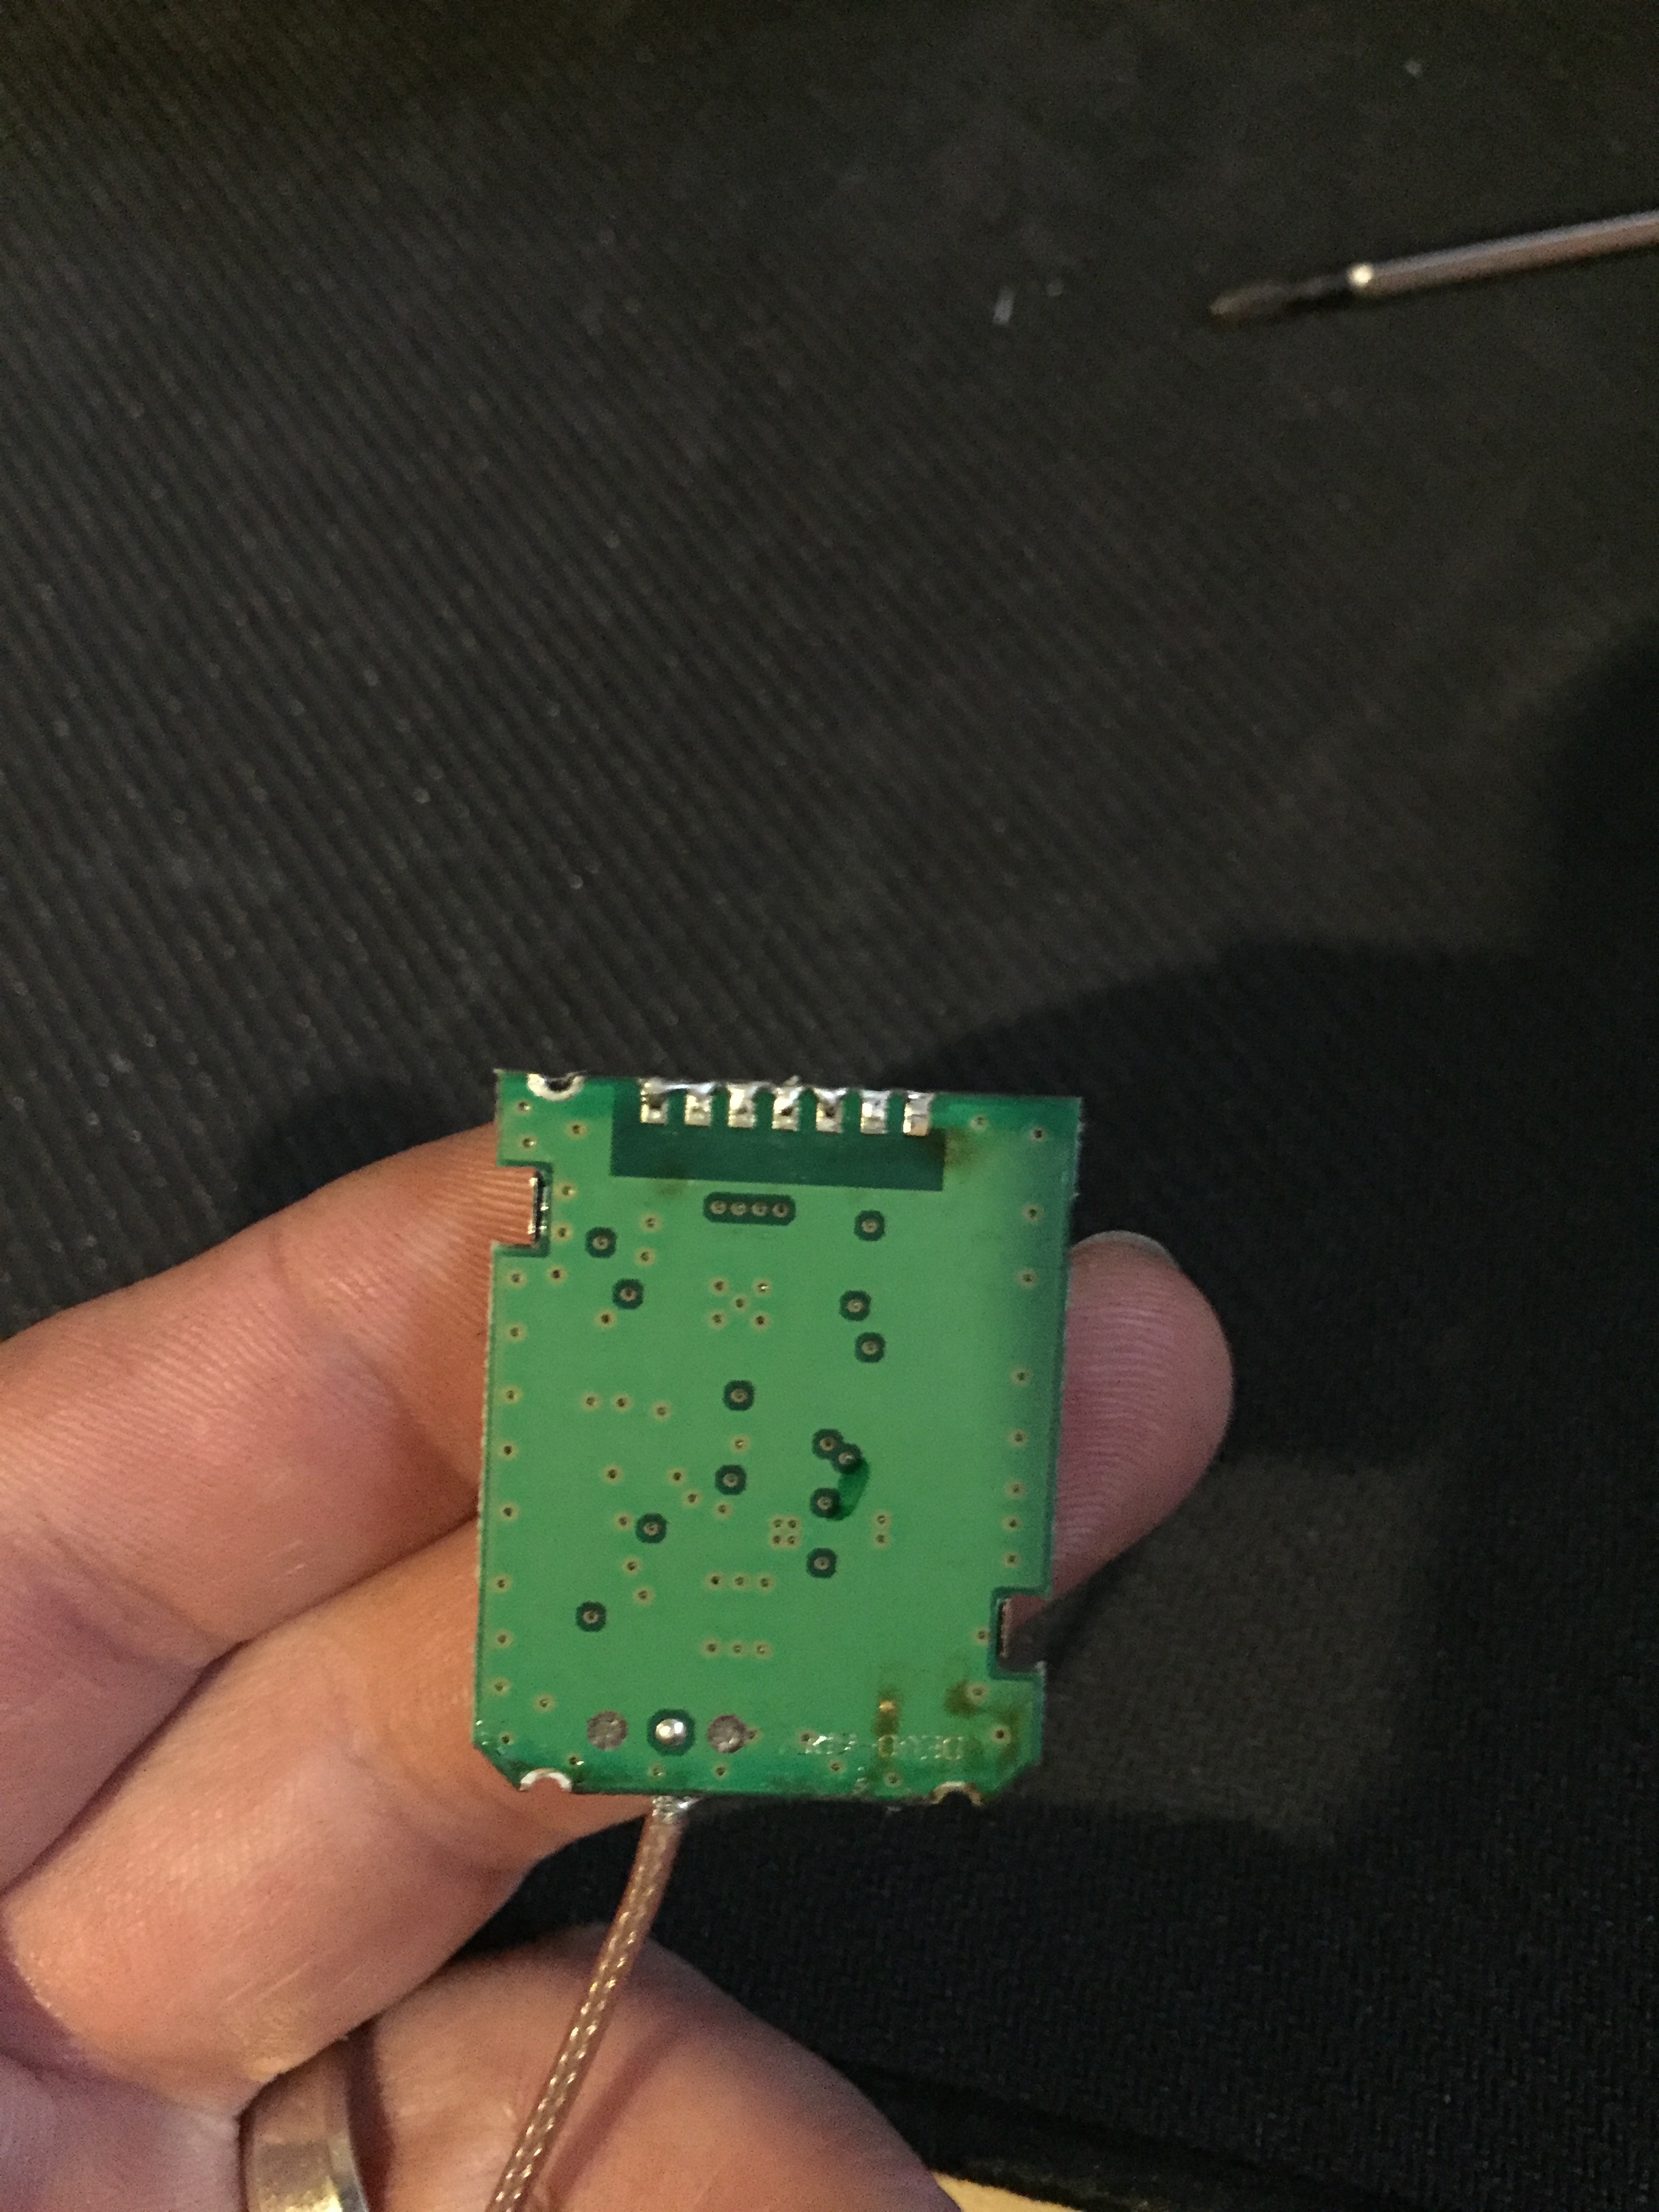
Here is the bottom of the stock module removed, as you can see those solder points on the front are the main ones people have problem with lifting traces. If you add lead solder and be patient all of those points will melt at once and the front of the chip will lift up with no difficulty at all.. hope this helps!
Edit: The RF shield is still attached to the front, I did not remove it. After removing as much solder from the back 2 points holding the module down with solder wick, stick a small screw driver in the RF shield slot in the left side to apply a very small amount of upward pressure as you melt all the bottom connections with lead solder. Clean up the extra solder with wick and scrub with alcohol, should be good to go.
Edit: The RF shield is still attached to the front, I did not remove it. After removing as much solder from the back 2 points holding the module down with solder wick, stick a small screw driver in the RF shield slot in the left side to apply a very small amount of upward pressure as you melt all the bottom connections with lead solder. Clean up the extra solder with wick and scrub with alcohol, should be good to go.
Last edit: 09 Mar 2017 12:29 by ClittleJ.
- ScotY
-
- Offline
Less
More
- Posts: 7
09 Mar 2017 17:25 - 09 Mar 2017 17:28 #60043
by ScotY
Replied by ScotY on topic 7e/Ultimate7e, adding the devo version 4in1
Thanks for posting your procedure and pics...they really help!
It's still hard to tell from your picture...are there legs on the back of the module (like an IC chip) that attach to the main board or are they pads? If it's pads, I can see why it's hard to remove...probably more mass to heat up.
Please correct me if I'm misunderstanding. Looks like there are 3 solder points to remove the shield (which can remain attached to the module) and then the row of pins. That's all that holds the module on? Was there any kind of adhesive behind the board as some have mentioned?
Last edit: 09 Mar 2017 17:28 by ScotY. Reason: Added more questions. :-)
- ClittleJ
-
- Offline
Less
More
- Posts: 43
09 Mar 2017 18:41 #60046
by ClittleJ
Replied by ClittleJ on topic 7e/Ultimate7e, adding the devo version 4in1
They are pads, with Non-lead solder so it's hard to melt. Just use a lot of lead solder on top of everything and slowly rub it. After a short time you will feel the non lead solder melt, then you're in business!
There are 4 solder points holding the shield to the module, and 3 big ones holding the module to the board(along with all these little pads). The board is just attached with flux, it feels slightly tacky but is not stuck. The heat from the soldering will make it melt, you'll have to wipe up some burnt flux mess after with alcohol and q-tips. So if you remove as much solder from the back two first(just add lead solder till you melt it all, and solder wick away what you can) then it's easier for the front of the board to lift when you are working on the front side.(Add a ton of lead solder to the whole front, have little screw driver in RF shield hole and slightly press up while running your tip from that last solder point over all
The 'pins' and back again over and over slowly 'scraping' away at the 'pins' every time. You will feel the non leaded solder melt, and the whole chip will lift) hope this helps!
Cheers
- Desode
-
- Offline
Less
More
- Posts: 14
10 Mar 2017 12:53 #60085
by Desode
Replied by Desode on topic 7e/Ultimate7e, adding the devo version 4in1
I am close to starting this myself but I have one quick question for now! Loll
Does the 4 in 1 module increase the range or do I still need to do the range mod?
If I still need to do the range mod then should I do it first before the 4 in 1?
Thanks for your time and consideration,
Sincerely Desode
Does the 4 in 1 module increase the range or do I still need to do the range mod?
If I still need to do the range mod then should I do it first before the 4 in 1?
Thanks for your time and consideration,
Sincerely Desode
- ClittleJ
-
- Offline
Less
More
- Posts: 43
10 Mar 2017 14:23 #60089
by ClittleJ
The range mod is normally performed on the Devo7e stock module, it's a diode short under the RF shield. Since you would be removing the module in the 7e to replace with the 4in1 (which has PA's for all the modules) There wood be no need to do the range mod. Hope this helps! Good luck!
Replied by ClittleJ on topic 7e/Ultimate7e, adding the devo version 4in1
Desode wrote: I am close to starting this myself but I have one quick question for now! Loll
Does the 4 in 1 module increase the range or do I still need to do the range mod?
If I still need to do the range mod then should I do it first before the 4 in 1?
The range mod is normally performed on the Devo7e stock module, it's a diode short under the RF shield. Since you would be removing the module in the 7e to replace with the 4in1 (which has PA's for all the modules) There wood be no need to do the range mod. Hope this helps! Good luck!
- Desode
-
- Offline
Less
More
- Posts: 14
10 Mar 2017 15:32 #60093
by Desode
Replied by Desode on topic 7e/Ultimate7e, adding the devo version 4in1
Thanks for the info! That really adds to the 4 in 1 module being a great upgrade!
Desode
Desode
- Phoenixx
-
- Offline
Less
More
- Posts: 25
10 Mar 2017 16:32 #60094
by Phoenixx
Replied by Phoenixx on topic 7e/Ultimate7e, adding the devo version 4in1
Will disabling one or more of the modules save battery power? I don't need the CYRF6936 or CC2500
- ClittleJ
-
- Offline
Less
More
- Posts: 43
10 Mar 2017 22:23 #60104
by ClittleJ
Replied by ClittleJ on topic 7e/Ultimate7e, adding the devo version 4in1
I don't know a whole bunch on how these things work, but from what I understand;
The CYRF module may be hard to leave out since it's the stock module and it connects to the 7 solder pads, you'd have to ask someone which ones not to connect for that. The other 3 are just wires that go to other connections on the board and easily labeled in the schematic.
As for saving battery power, I believe the TX only uses 1 module at a time and they all share the same PA and antenna. I could be wrong about this as I don't fully understand how it's wired inside.
- HappyHarry
-
Topic Author
- Offline
Less
More
- Posts: 1136
11 Mar 2017 12:14 #60123
by HappyHarry
Replied by HappyHarry on topic 7e/Ultimate7e, adding the devo version 4in1
afaik as deviation stands atm the cyrf must be visible or it won't boot, one of the devs (was either vlad_vy or victzh) talked about moving this hardcoded check to the same area as the checks for other rf chips (as in only check for it if it is enabled in hardware.ini) but whether this has bern commited yet I'm unsure, I'll check git later and post back when I know for sure
- burtlo
-
- Offline
Less
More
- Posts: 2
16 Mar 2017 12:47 #60246
by burtlo
Replied by burtlo on topic 7e/Ultimate7e, adding the devo version 4in1
Thanks for all this information. I journaled a blow-by-blow of this hardware mod thus far here:
community.micro-motor-warehouse.com/t/bu...tter-module-mod/3939
I still have to recompile and update Deviation on the transmitter.
After that, I've got the CPU upgrade, the four 3-way switch mod, and then the 2 potentiometer mods, all ahead of me.
Y'all rock, especially you, HappyHarry!
I still have to recompile and update Deviation on the transmitter.
After that, I've got the CPU upgrade, the four 3-way switch mod, and then the 2 potentiometer mods, all ahead of me.
Y'all rock, especially you, HappyHarry!
- kabo
-
- Offline
Less
More
- Posts: 32
20 Mar 2017 02:34 #60390
by kabo
Replied by kabo on topic 7e/Ultimate7e, adding the devo version 4in1
Do you mean plain frsky as in *frsky?
I can only find *frsky to be the plainest in my selections, and then I don't get a "bind", I get only a "re-init" with or without an Id setting of 123456 or none
Thanks Larry
Fyi trying to bind with a emachine x73, and have the 7105 installed and test working
I can only find *frsky to be the plainest in my selections, and then I don't get a "bind", I get only a "re-init" with or without an Id setting of 123456 or none
Thanks Larry
Fyi trying to bind with a emachine x73, and have the 7105 installed and test working
- ClittleJ
-
- Offline
Less
More
- Posts: 43
20 Mar 2017 04:47 #60392
by ClittleJ
Replied by ClittleJ on topic 7e/Ultimate7e, adding the devo version 4in1
Could be wrong, I don't have my tx here with me at work, but I think when I uploaded the nightly build I got more Frsky protocol options. I think there was only 1 with 5.0, and the nightly has 3? Can't confirm atm.
- kabo
-
- Offline
Less
More
- Posts: 32
20 Mar 2017 13:26 #60422
by kabo
Replied by kabo on topic 7e/Ultimate7e, adding the devo version 4in1
I'm pretty sure I'm on a nightly as well, not sure when but I did it to get the e010 protocol. I've got 3 Frsky's:
*Frsky
*Frsky-V8
*FrskyX
All with an * astrik in front and all only allow re-init, no bind
Flysky is plain no * but Flysky is nothing like Frsky
or copy and paste model.ini so I can figure how to get the3 bind, option, I know this is not 4 in1 but I'm here as I'm building another 7e with a 4 in 1 and I'll have the same problem.
Larry
Larry
- ClittleJ
-
- Offline
Less
More
- Posts: 43
20 Mar 2017 13:53 - 20 Mar 2017 14:00 #60424
by ClittleJ
Replied by ClittleJ on topic 7e/Ultimate7e, adding the devo version 4in1
My 3 FrSky options do not have the asterisks in front of them. Are you sure your CC2500 module is working? Or maybe needs to be activated in the hardware.ini?
I believe the asterisks before the protocol means the module isn't working, or the hardware.ini needs to be changed.
Edit: I see you mentioned A7105 module, the FrSky protocols use the CC2500 module I believe. That would explain the asterisks. I also believe, but not 100% sure, that some protocols use "bind" and some use "re-init" but they don't change. The re-init button should work the same as a bind button for whatever you're using. Maybe someone can chyme in with some better technical info for you but I know a few of my models use bind and a few use re-init, depending on the protocol. Hope this helps. Cheers
Last edit: 20 Mar 2017 14:00 by ClittleJ.
- aMax
-
- Offline
Less
More
- Posts: 776
20 Mar 2017 16:37 #60435
by aMax
Devo7e, TaranisQ X7, R9M , 4in1 MM, Futaba FC18plusV3.2 & DFT/FLD-02
Replied by aMax on topic 7e/Ultimate7e, adding the devo version 4in1
Devo7e, TaranisQ X7, R9M , 4in1 MM, Futaba FC18plusV3.2 & DFT/FLD-02
- mwm
-
- Offline
20 Mar 2017 17:06 - 20 Mar 2017 17:10 #60436
by mwm
Do not ask me questions via PM. Ask in the forums, where I'll answer if I can.
My remotely piloted vehicle ("drone") is a yacht.
Replied by mwm on topic 7e/Ultimate7e, adding the devo version 4in1
Yes, the "*" means the firmware doesn't think it has the hardware to talk to that protocol. The FrSky protocols all need the CC2500. If you didn't get a warning about "missing module" at boot time, then you need to enable the module in hardware.ini.
The FlySky protocol uses the A7105. Since it's not got the "*", you've set up the A7105 properly.
Edit 'cause I forgot: Re-Init vs. Bind generally isn't an issue. Some protocols don't "Bind" in the original sense of "will only work with the bound Rx", but connect to whatever they see when they initialize, hence "Re-init". Some do both. I don't think we're consistent about which we use across protocols.
Do not ask me questions via PM. Ask in the forums, where I'll answer if I can.
My remotely piloted vehicle ("drone") is a yacht.
Last edit: 20 Mar 2017 17:10 by mwm.
- kabo
-
- Offline
Less
More
- Posts: 32
21 Mar 2017 05:27 #60467
by kabo
Replied by kabo on topic 7e/Ultimate7e, adding the devo version 4in1
Thanks, * means something, is there documentation somewhere I missed?
Thanks again, as I said I'm getting another devo 7e to mod and a 4 in 1 so no more *
Thanks again, as I said I'm getting another devo 7e to mod and a 4 in 1 so no more *
- Chimera
-
- Offline
Less
More
- Posts: 51
29 Mar 2017 22:04 #60923
by Chimera
Replied by Chimera on topic 7e/Ultimate7e, adding the devo version 4in1
Can anyone tell me what the name/type of the block is on the Devo 10 that the 4-in-1 plugs in to? I want to use a similar idea on my 7e so I can just plug in the 4-in-1 (and 2 of the 3 extra modules) but I can't find the right female block. The ones I ordered have a wider pin spacing (I stupidly thought these male/female pin headers would be universal). Thanks!
- Gerhard_H
-
- Offline
Less
More
- Posts: 138
30 Mar 2017 06:29 #60936
by Gerhard_H
Normal/universal spacing is 2,54 mm (the tenth of an inch), but the actual one is 2,0 mm. Therefore you have to look for 2mm blocks, I'm not quite sure, but I think thery're called "socket terminal strips", you do need
"2x5-pin socket terminal strip straight RM 2.00"
Straight means that the pins on the block go straight which means you may need room for the pins, maybe in your case would be an "angled" block, therefore look for
"2x5-pin socket terminal strip angled RM 2.00"
Just as an example :
www.reichelt.at/Buchsenleisten/2/index.h...312cc27f&LANGUAGE=EN
Replied by Gerhard_H on topic 7e/Ultimate7e, adding the devo version 4in1
No ways stupid . . .Chimera wrote: . . . (I stupidly thought these male/female pin headers would be universal) . . .
Normal/universal spacing is 2,54 mm (the tenth of an inch), but the actual one is 2,0 mm. Therefore you have to look for 2mm blocks, I'm not quite sure, but I think thery're called "socket terminal strips", you do need
"2x5-pin socket terminal strip straight RM 2.00"
Straight means that the pins on the block go straight which means you may need room for the pins, maybe in your case would be an "angled" block, therefore look for
"2x5-pin socket terminal strip angled RM 2.00"
Just as an example :
www.reichelt.at/Buchsenleisten/2/index.h...312cc27f&LANGUAGE=EN
- Chimera
-
- Offline
Less
More
- Posts: 51
30 Mar 2017 10:33 #60939
by Chimera
Replied by Chimera on topic 7e/Ultimate7e, adding the devo version 4in1
thank you so much Gerhard, that's exactly what I needed!
Time to create page: 0.575 seconds